An Injury Guide For Triathletes
Here's your go-to resource for treating and preventing common ailments.
New perk! Get after it with local recommendations just for you. Discover nearby events, routes out your door, and hidden gems when you sign up for the Local Running Drop.
There’s no doubt about it: Injuries are frustrating, painful—and all too common. In a five-year study from Great Britain of a small group of triathletes, 72% sustained injuries, and rates were the same whether they were doing Olympic- or iron-distance training. Yet doctors, physical therapists and other experts say that too often, athletes make certain mistakes that help steer them right to the sidelines. Stay healthy the rest of your season by avoiding these common problems. Keep this one bookmarked and refer to it whenever you need a handy reference. Advice below comes from several experts with the majority coming from Dr. Jordan Metzl, author of The Athlete’s Book of Home Remedies.
Achilles Tendinitis
Marked by mild to debilitating pain in the back of the heel, the tendon just above it, or possibly up to where the calf muscles form a V on the back of the leg, Achilles tendinitis is inflammation of the Achilles tendon, the thick, ropelike tendon connecting the gastrocnemius and soleus muscles in the lower leg to their insertion points at the heel bone. Here’s what you can do about it:
Fix It
Employ dynamic rest. With Achilles injuries, in general, swimming is fine and biking can work, but only if it’s pain free. Running is a huge no-no and will make the injury worse.
Ice it. Applying ice to the area for 15 minutes 4 to 6 times a day can help reduce inflammation and swelling.
Stretch it. Don’t stretch if it brings pain. Once you can do so without pain, do the classic runner’s stretch with your hands against a wall (see right).
Strengthen it. A tendon like the Achilles starts to hurt because of the load on it. If you want to reduce the loading force, build up the muscles affecting that load so they can take the brunt of it. Once you’re pain free, recondition your lower body. Start with eccentric calf raises: Stand with your heels hanging off a step, take 10 seconds to lower them, then raise them back up at a normal rate. Also add in plenty of plyometric lower-body work like squats, multidirectional lunges and squat thrusts.
Prevent it. The best way to prevent Achilles tendinitis in the first place is by building limber lower legs. An underlying lack of flexibility, especially in your calf muscles, can cause Achilles injuries. The stretches and exercises here all target your lower leg and can be added to any workout.
Keep It Healthy
Watch your foot mechanics. Pronation (when the foot rolls inward as you walk or run) can contribute to Achilles injuries. Stability shoes and/or over-the-counter arch supports can help correct the problem.
Shorten your running stride. Doing this while increasing your foot strike cadence may help you generate better stride mechanics because you’ll be putting a lot less load on your feet, shins and knees. While running, count how many times your right foot strikes in 60 seconds. Shoot for 85 to 90 per minute.
Try This Move
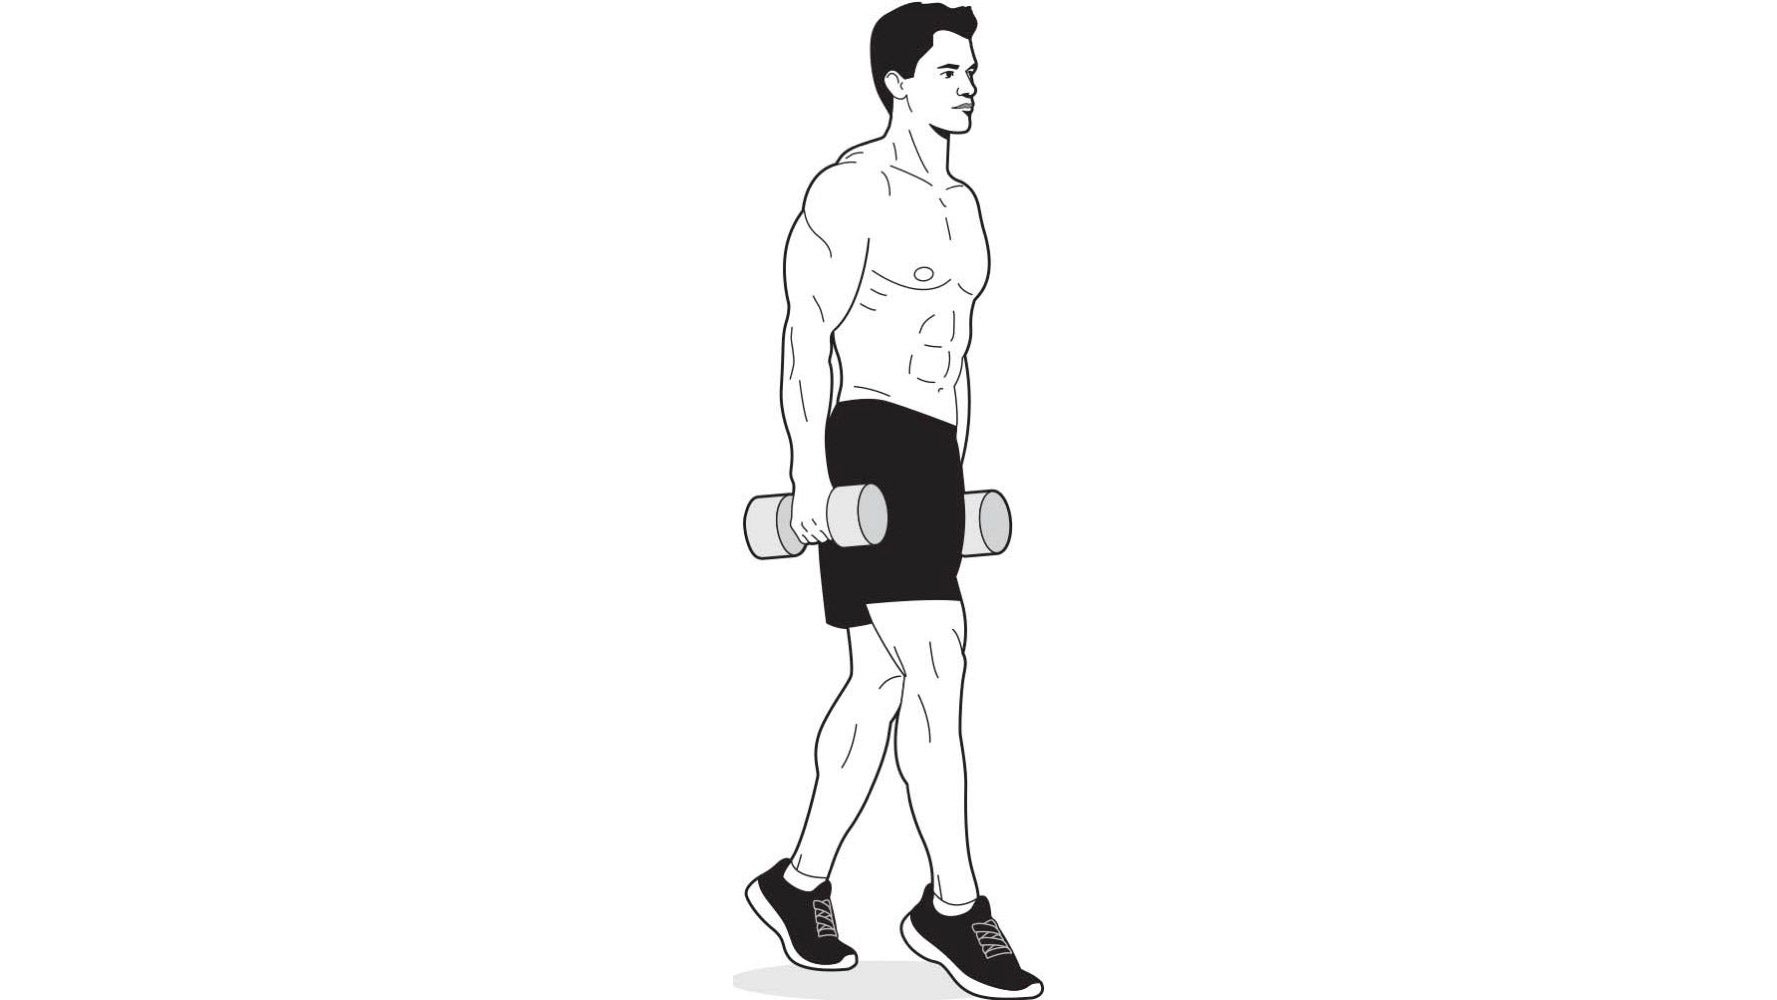
Farmer’s Walk on Toes

Grab a pair of heavy dumbbells and hold them at your sides at arm’s length. Raise your heels and walk forward (or in a circle) for 60 seconds. Be sure to stand as tall as you can and stick your chest out. Choose the heaviest pair of dumbbells that allows you to perform the exercise without breaking form for 60 seconds.
More achilles tendinitis prevention exercises
See also: How To Use Strength and Conditioning Effectively for Achilles Injury Prevention
Plantar Fasciitis
Plantar fasciitis is characterized by nasty pain in the bottom of the foot, especially when running or even taking your first steps out of bed in the morning.
The pain is inflammation of the plantar fascia (plantar means the bottom of the foot, and its fascia is the band of connective tissue running from your heel bone to the front of your foot). This tissue helps support your foot’s arch and give it shape, and it aids in stability when your foot strikes the ground and then pushes off.
The inflammation and pain come from excessive tension. The muscles above and the shape of the foot below contribute to its development. The calf muscles connect to the heel bone via the Achilles tendon. When those muscles are tight, the tendon pulls on the bone from above, stretching the fascia and causing strain. People with high arches are especially prone to plantar fasciitis because the arch itself also contributes tension to the fascia.
A mild case can turn major very quickly. Inflammation makes the fascia more prone to microtears, which can lead to debilitating pain. In other words, you can’t walk, let alone exercise. Bad cases can last months. But here’s what you can do about it.
Fix It
Employ dynamic rest. Take a break from the offending activity. The earlier you address plantar fasciitis, the better. How long you need to rest depends on the severity of the case, but expect to be sidelined for at least a couple of weeks. Stick with intense upper-body activity that doesn’t load your foot. Does that stink? Sure. But it beats crippling yourself!
Stretch. Use the stretches described at right. Be gentle. Go slow. You’re trying to relieve the tightness in the area, not prepare for a game or race. As the injury heals, adopt the stretching habit permanently.
Try an NSAID. An anti-inflammatory like ibuprofen or naproxen can help reduce pain and inflammation.
Consider night splints. Foot splints are available (usually from $20 to $60) and can help if worn at night. It’s best to have a doctor recommend the best one for your case, as there are several varieties.
Keep It Healthy
Stay flexible. The best way to stretch this area is to put your toes and the ball of your foot against the top of the vertical edge of a step with your heel on the floor and slowly lean forward, keeping your leg straight, until you feel the stretch at the top of your calf. Repeat the stretch with your knee bent, feeling the stretch farther down the leg near the Achilles tendon. Hold each stretch for 15 to 20 seconds and repeat several times in each position. Ideally, you’ll do this daily, before and after exercise.
Try orthotics. Over-the-counter (OTC) hard arch supports can be helpful, especially for you high-arched folks. Prescription orthotics are another option because they’re custom-made for your foot, but I suggest trying the (much cheaper) OTC orthotics first because in my practice, about 90 percent of patients have good results with them. If they don’t work, then see a podiatrist for a custom set.
Try This Move
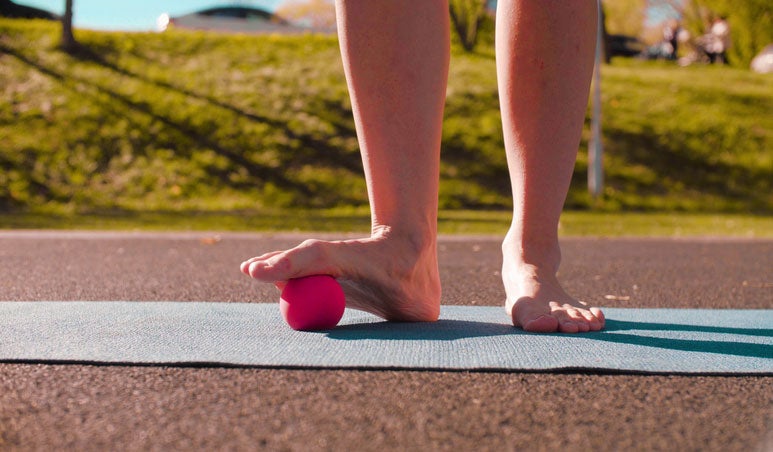
Roll a tennis or golf ball back and forth under each foot for a few minutes a day to loosen the fascia.
More plantar fasciitis prevention exercises
See also: Try This Technique For Battling Plantar Fasciitis
Shin Splints
Shin splints have derailed many an athlete’s hard-won training gains. They’re among the most frustrating injuries because they make a basic act—running—impossible. But the term “shin splints” actually denotes more than one lower-leg ailment.
In about 90 percent of cases, shin splints are characterized by pain in the bony part of the shin, along the tibia, during and after exercise and when you press on the area. This is bone-related shin pain, called medial tibial stress syndrome, and can cover a broad spectrum of ailments, ranging from a stress injury—irritation of the bone—to a stress fracture, an actual crack in the bone.
The bone swells and, if irritated for long enough, a stress fracture can occur. It’s generally the result of three variables: body mechanics, amount of activity and bone density. Body mechanics include foot type, foot strike and how your body is built. Activity can cause it if you up your training workload too soon. Bone density can be a bigger factor for women. All three of these variables can be altered or compensated for to help alleviate the problem.
Less common (about 10 percent of cases) is muscular shin pain, in which there’s a tightening pain in the soft, outside, muscular part of the shin. The pain is usually bad enough that running becomes impossible, and then it subsides when you stop running. The symptoms above usually signal exertional compartment syndrome (ECS). ECS can occur in any part of the lower leg, and patients often report that their legs feel so tight that they might explode. Eighty percent of ECS cases happen in the front part of the shin.
RELATED: 7 Steps To An Injury-Free Season
Fix It
Bone-related:
See a doctor for a proper diagnosis. Stress injuries can become stress fractures, which can sideline you for a long time.
Employ dynamic rest. Find another activity that doesn’t load your legs. Swimming and stationary biking are good choices.
Muscular:
Foam roll it. Part of the problem with ECS is tight fascia, the tough material that wraps most of our muscles. Run your shins and calves over a foam roller for several minutes several times a day to help loosen the fascia. Manual massage can help as well.
If these measures don’t help, see a doctor. For bone-related pain, it’s best to get a doctor’s diagnosis because then you’ll know the severity of the injury. You’ll need an MRI to determine if a stress fracture is present because stress fractures don’t show up on X-rays unless they’re very severe or healing. Your doctor may also do a bone-density scan.
Prevent It
Change your shoes. Try switching to a shoe that limits pronation, which can help prevent both muscular and bone-related pain. Arch supports can help as well.
Up your calcium and vitamin D intakes. Try 1,300 milligrams of calcium and 400 micrograms of D per day. Easy food sources are milk and yogurt.
Follow the 10 percent rule. Never up your weekly running mileage by more than 10 percent.
Train your hips and core. Strengthening these areas will make you a stronger runner, which improves foot strike and body mechanics.
Shorten your running stride. Doing this while increasing your foot strike cadence may help you generate better stride mechanics because you’ll be putting a lot less load on your feet, shins, knees and on up the kinetic chain. Count your foot strikes on one side for 1 minute. A good number is 85 to 90 strikes of one foot per minute.
Foam roll and massage. If the problem is muscle-related, foam rolling and bodywork can help loosen the fascia.
Try This Move
Foot screws
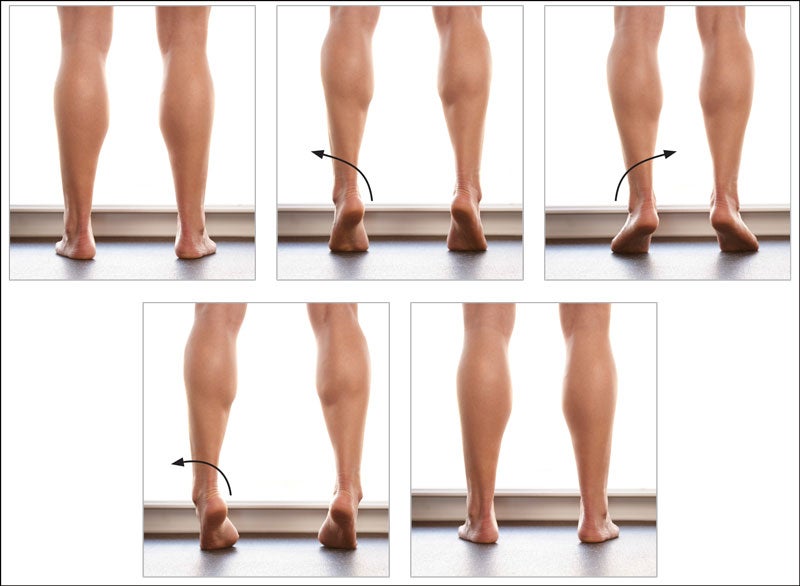
This foot screws move comes from Running Rewired authored Jay Dicharry.
- Stand on both feet, keeping equal pressure across the tripod of each forefoot.
- Twist the rearfoot slightly out while keeping the big toe grounded, then raise your heels an inch or so.
- Staying up on your toes, let the rearfoot twist inward.
- Press the big toe into the floor to push your arch up and screw the heel into the outward position.
- Lower the foot to the floor and relax. This is one full rep. Keep the movement specific and controlled.
- Perform 20 reps.
More shin splints prevention exercises
See also: Could Your Injuries Be Caused By Weak Feet?
IT Band
The Symptoms
Hip or knee pain, or both. Specifically, pain on the outer side of the knee where the bone bumps out above the joint, or on the outer side of the hip. The pain usually starts after 10 minutes of running. Walking usually causes no pain.
What’s Going on in There?
The iliotibial band (ITB) is a thick tendon that runs the length of and connects the tensor fascia lata muscle—which starts on the outer side of the hip—to the outer side of the tibia, the major bone in the lower leg.
Here’s how the pain happens: A small, fluid-filled sac called a bursa sits between the tendon and the outside of the femur near the knee. You also have a bursa at the hip joint. When the ITB is tight, it increases the tension on the outer sides of the hip and knee. The ITB then pinches these two sites and the bursa (one or both) swells. Over time, the bursa becomes enlarged—big enough to cause pain every time you begin to run (which is why pain usually starts within 10 minutes of activity).
Fix It
• Roll it: A 6-by-36-inch foam roller is the best tool for stretching the ITB. Lie on your side with the roller under your leg and roll it from your hip to your knee (see right), using your body weight to knead the area. The pressure will help loosen the tendon and the fascia, almost like a self-massage. Do this at least once a day for several minutes, and make it a permanent part of your exercise activity.
• Beef up your glutes and hips. Weak butt and hip muscles contribute to ITB impingement syndrome. Make sure your lower-body work includes squats, especially single-leg squats, as well as multidirectional lunges (for more ideas, see exercises and stretches below).
• Having a properly fitted bike can help triathletes who suffer from ITB impingement while riding.
Prevent It
Build up your glutes to reinforce the body’s largest and potentially most powerful muscle group.
Try This Move
Lying Glute Stretch
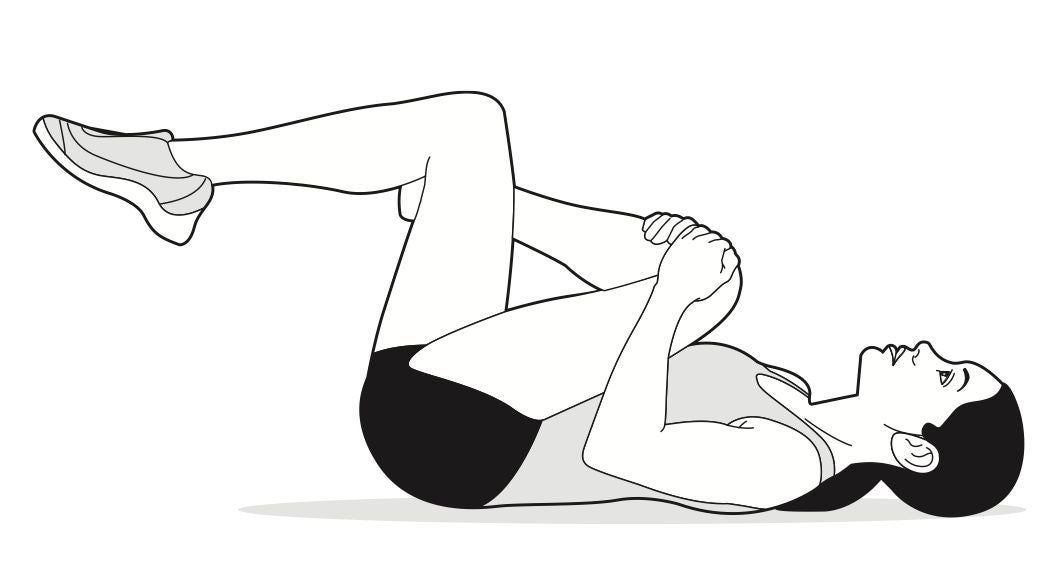
Lie face-up on the floor with your knees and hips bent. Cross your right leg over your left so that your right ankle sits across your left thigh. Grab your right knee with both hands and pull it toward the middle of your chest until you feel a comfortable stretch in your glutes. Hold for 30 seconds, then repeat on the opposite side. Repeat twice for a total of three sets—and several times a day if you’re really tight.
More IT band pain prevention exercises
See also: Ask a Trainer: What Are The Best Resistance Band Exercises?
Back Pain
The Symptoms
Muscular back pain usually comes on instantly. Pain radiates from both sides of the spine and the muscles feel as though they’re locked up. It can be severe and debilitating.
What’s Going On In There?
Muscular back pain is the most common type of back pain. It involves the paraspinal muscles, which are strong muscles on either side of the spine that enable you to move, twist and bend the spine.
So what brings on the pain? In general, the paraspinous muscles are too tight, too weak or both. A sudden twisting or wrenching, bending forward, and even a direct impact on the muscle can set it off.
Fix It
Employ dynamic rest. Stay mobile. During the acute stage, avoid straining your back, but do simple stretches to loosen your hamstrings, hip flexors and glutes (see examples below). All of these can help alleviate the spasms.
Ice it, then heat it. Apply ice for 15 minutes four to six times a day for the first two days. After 48 hours, using a heating pad at the same time intervals can help relieve the spasms.
Try an NSAID. An anti-inflammatory like ibuprofen or naproxen can help with pain and inflammation.
Vary your therapies. Effective back pain therapies are very individualized. For example, some of my patients respond well to massage therapy. Acupuncture and chiropractic can also be effective for muscular back pain. Try different therapies until you get results.
Stretch and strengthen your kinetic chain. As the pain subsides, start the reconditioning process with basic core strengthening and stretching exercises. Go slow. Stretch your hamstrings, hip flexors, glutes and core.
Try This Move
Prone Cobra
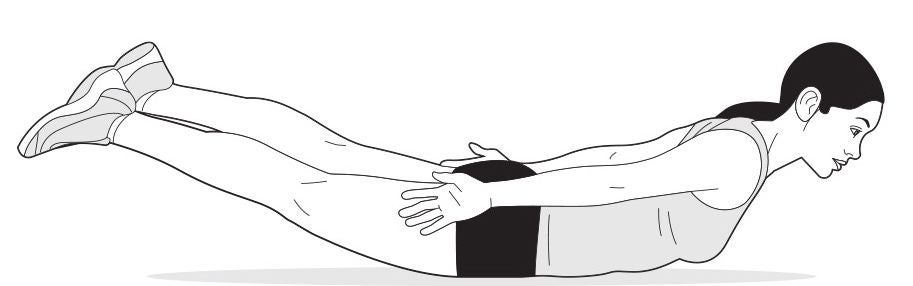
Lie face-down on the floor with your legs straight and your arms next to your sides, palms down. Contract your glutes and the muscles of your lower back, and raise your head, chest, arms and legs off the floor. Simultaneously rotate your arms so that your thumbs point toward the ceiling. At this time, your hips should be the only parts of your body touching the floor. Hold this position for 30 seconds to a minute.
More back pain prevention exercises
See also: 4 Ways to Decrease Lower Back Pain After a Bike Ride
Road Rash
Road rash from a cycling crash is not an especially deep injury, but it can bleed and is definitely painful. If the abrasion is large, see a doctor. Otherwise, treat it at home with these tactics.
Clean It.
Clean the area with a mild soap and water. Abrasions like road rash are loaded with dirt from whatever surface it was that you dragged yourself across. Scrub gently—you don’t want to cause any more damage. If you can’t scrub it because it hurts too much, try pouring soapy water over it. Use tweezers to remove any gravel. Oh, and take an NSAID like ibuprofen or naproxen to help with the throbbing, because this will hurt.
Dress It.
Apply a layer of triple-antibiotic ointment (like Neosporin) to the entire road rash area. It’s also helpful to apply a layer of petroleum jelly on top of that to prevent the bandage from sticking to the flesh. Cover it with a sterile gauze pad and tape. Change the dressing once a day. It will be gooey and ooze, which is nasty but normal. Big abrasions like road rash usually heal from the deeper layers of the skin outward, and also from the edges toward the center. If the bandage sticks to the wound, don’t try to pull it loose. Soak it in the bathtub for about 20 minutes and it should come off easily.
Watch It.
If you see redness and swelling, and the wound feels hot or secretes pus, your road rash could be infected. See a doctor.
See also: Bouncing Back From A Bike Crash
Runner’s Knee
Patellofemoral knee pain (aka “runner’s knee,” thanks to how prevalent it is among runners) is characterized by pain beneath the kneecap that’s worst after you finish an activity. It’s especially sore going up or down stairs, tends not to swell, and typically becomes most aggravated after about an hour of running, when your quads start to tire.
The patella (kneecap) has to withstand tremendous amounts of force, and the direction in which the patella moves is directly related to the forces that come from the quads.
Pain can come from several causes. One is an injury to the cartilage under the patella. Poor running or biking mechanics resulting from weak or tight muscles can contribute. Poorly conditioned glutes, core muscles, hips and quads can lead to pelvic instability, which can affect the knees. I see this condition in more women than men because of what is called the Q angle or the knock-kneed angle, which is caused by their wider hips and can result in overpronation (when the foot falls inward).
Fix It
Employ dynamic rest. As you work to rehab the injury, stay fit with vigorous upper-body work, plus pool running and/or biking if you can do so without knee pain. Meanwhile …
Strengthen your knees, quads, and hips. Weak or inflexible quads are a particular source of knee pain, but upping your strength and flexibility throughout these three areas will help both ease the pain and improve your form once you return to your normal training. Plyometric lower-body exercises can help with strength and flexibility, so add multidirectional lunges, planks, skater plyos, squats and squat jumps to your workout.
Work on body mechanics. Poor running form can bring on this condition. A good way to see what your form looks like is to have a friend record you running toward a video camera or camera phone. You may see things you never realized you were doing. Do your knees fall inward? Do your feet roll inward or outward? Increasing your strength and flexibility can help your mechanics, but you may have to concentrate on proper form or seek out a coach to help you retrain yourself.
Try This Move
Walking Lunge (dumbbells optional)
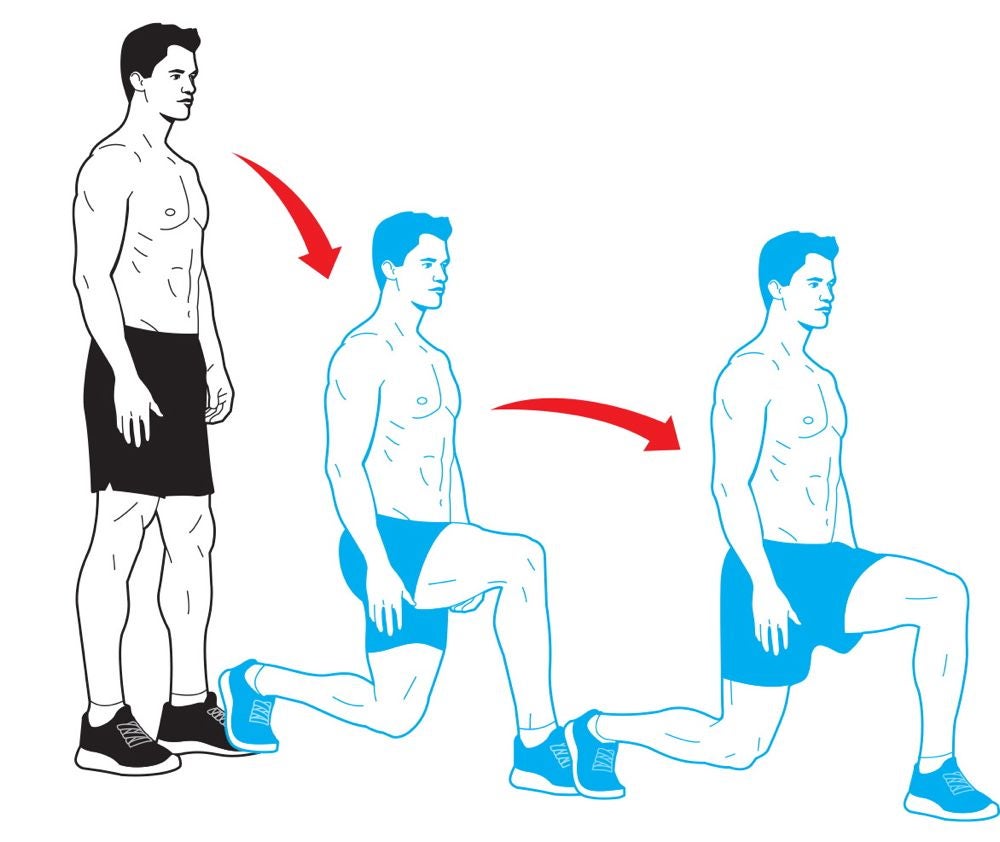
Perform a lunge, but instead of pushing your body backward to the starting position, rise up and bring your back foot forward so that you move forward (as though you’re walking) a step with every rep. Alternate the leg you step forward with each time. When you complete the prescribed number of repetitions, perform backward walking lunges to return to your starting point.
More runner’s knee prevention exercises
See also: DIY Diagnosis: Runner’s Knee Vs. Iliotibial Band Syndrome
Shoulder Labrum Tear
A labrum tear is characterized by pain in the shoulder, especially with overhead exertion; a clicking or grinding sensation, and possibly locking of the joint; and weakness and/or joint instability.
Some background on your labrum: The ball-and-socket joint that joins the humerus and the scapula has a very shallow socket called the glenoid socket. Thick cartilage called the labrum rims that socket, surrounding and protecting the ball of the humerus and allowing the joint to move freely. Cartilage on the end of the humerus works with the labrum to give you a smooth-functioning joint. Certain tendons, like the biceps tendon, attach to the labrum as well.
There are different kinds of labrum tears: fraying of the labrum (generally asymptomatic); above the midpoint of the glenoid socket (superior labrum tear); below the midpoint (inferior tear); and a superior tear that involves the biceps ligament is a SLAP (superior labrum from anterior to posterior) lesion.
What causes labrum tears? Repetitive motion (think baseball pitchers and freestyle swimmers); a sudden pull on the arm, such as when lifting a heavy weight; an explosive reaching motion; a direct impact to the shoulder; a fall on an outstretched arm.
Fix It
See a doctor. Any shoulder pain—especially when caused by an acute injury, like a fall—needs to be evaluated by a sports doctor.
Employ dynamic rest. Lay off the upper-body work and use lower-body workouts to maintain fitness.
Ice it. Ice applied to the shoulder for 15 minutes several times a day can help reduce inflammation.
Try an NSAID. An anti-inflammatory like ibuprofen or naproxen can help with the pain.
Start rehabbing. As the pain improves, do some rotator cuff exercises to help strengthen your shoulder. Here are two.
Shoulder Squeeze #1: Lie facedown on an exercise bench. Hold your arms out to your sides parallel to the floor, bent at 90 degrees with your thumbs pointing toward the ceiling. Now try to raise your elbows toward the ceiling and feel your shoulder blades squeezing together. Hold for a moment and return to the starting position. Do 10 to 20 reps depending on your strength.
Shoulder Squeeze #2: While lying facedown on the bench, hold your arms along your sides with your palms up. Keeping your arms straight, lift your palms toward the ceiling, again feeling your shoulder blades squeeze together. Hold for a moment and return to the starting position. Again, do 10 to 20 reps.
Prevent It
Work the shoulder both ways. Having a strong, balanced shoulder is the best injury-prevention strategy, and the muscles in and around the shoulder respond well to exercise. Shoulder work must be a staple of your upper-body workouts, and you must work opposing muscle groups to avoid an imbalance. That means, for example, that if you do a pushing exercise such as bench presses or overhead presses, you need to do an equivalent amount of pulling movements, such as rowing and pull-ups.
When to See a Soctor
See a sports doctor immediately for any shoulder pain. Labrum tears show up on MRIs, but having one doesn’t necessarily mean surgery. The key is to make your symptoms go away. If they go away, you can exist just fine with a labrum tear, and generally, conservative, home-based therapies can relieve symptoms.
See also: Try This 5-Minute Shoulder Reset
Stress Fracture
The Symptoms
Pain that worsens over time, limits the sufferer’s ability to load the bone, and is generally concentrated in one specific area.
What’s Going On In There?
This is the classic overuse running injury. Unlike a bone break, which is the result of a trauma such as a twist or fall, a stress fracture develops over time due to repetitive loading. The demand on the bone simply exceeds the bone’s ability to withstand force.
There are three risk factors for a lower-leg stress fracture:
Activity level. Ramping up your athletic activity too fast can cause a stress fracture, such as adding too much mileage too soon during marathon training.
Mechanics. Excessive pronation—the foot rolling inward as it strikes—while running has been correlated with a greater risk of stress fracture. Also, weak core and hip muscles can promote poor running mechanics.
Bone density. This is common sense: The more brittle your bones, the easier it is to crack them. Low bone density (osteopenia) or very low bone density (osteoporosis) has several possible causes: genetics, as it tends to run in families; inadequate dietary calcium intake (1,300 milligrams a day is the recommended minimum); and, for women, a history of menstrual disorders, e.g., not getting a period for more than 6 months in a row, which can cause a low level of circulating estrogen.
We all acquire 90 percent of our bone density for life by age 18, and women reach their maximum bone density by age 32. After that, it’s about maintenance.
Fix It
Employ dynamic rest. Cease the offending activity. For how long varies depending on the severity of your injury, but expect at least a month. You can cross-train with swimming and biking as long as you don’t load the injury.
Support your arches. Orthotics (arch supports) can help fix pronation and improve your running mechanics. Over-the-counter products usually work just fine, but if not, consider custom orthotics.
Supplement. Eat more calcium- and vitamin D-rich foods or take supplements.
Prevent It
Change your shoes. Try switching to a shoe that limits pronation. Arch supports can help as well.
Up your calcium and vitamin D intakes. Try 1,300 milligrams of calcium and 400 micrograms of D per day. Easy food sources are milk and yogurt.
Follow the 10 percent rule. Never up your weekly running mileage by more than 10 percent.
Shorten your stride. A shorter running stride and faster foot cadence can reduce stress in your lower legs. Count your foot strikes for one minute on your right foot—shoot for 85 to 90 per minute.
Train your hips and core. Strengthening these areas will make you a stronger runner, which improves foot strike and body mechanics.
When to Call a Doctor
With stress fractures, the earlier, the better. Your doctor can confirm the diagnosis with X-rays and MRIs. However, stress fractures typically don’t show up on X-rays unless they’re very serious or already in the healing stage. The key is to treat both the symptoms and the causes, which you can do with the home-based tips found here. Your doctor will guide your care.
Depending on your individual case and family history, your doctor may also do a bone-density scan. If you have low bone density, the doctor can treat you for osteopenia or osteoporosis.
Don’t wait to see a doctor if you suspect you’re developing a stress fracture. It only gets worse the more demand you put on it, and eventually it’ll be so severe and painful that you won’t be able to walk.
See also: 3 Tips for Surviving a Stress Fracture
Calf Strain
The symptoms of mild (grade 1) calf strains include a twinge of pain in the back of the lower leg, with tightness and discomfort for 2 to 5 days afterward. Severe (grade 3) strains are marked by immediate excruciating pain, usually at the V in the calf muscles, along with an inability to contract the muscles. Bruising and swelling can appear later. Treat and prevent a calf strain with these strategies.
What’s Going In In There?
The calf muscles are the gastrocnemius (the larger one, which attaches above the knee joint) and the soleus (the smaller one, attaching below the knee joint). Both attach to the heel via the Achilles tendon.
Muscle strains happen when you sprint and the muscle isn’t prepared for the effort expended. Contributing factors include overuse, muscle weakness or tightness, and overtaxing a “cold” muscle.
Fix It
Dynamic rest. Avoid lower-leg work as much as possible. Do core and upper-body work to maintain your fitness.
Ice it. Ice the muscles for 15- to 20-minute stretches during the first 24 hours to help reduce pain, inflammation and muscle spasm.
Try a compression bandage. Compression can help keep swelling down during the first 24 to 48 hours after the injury. Compression sleeves are easiest, and elastic bandages work, too, but be sure not to wrap it too tightly. If your foot turns color or gets cold, it’s not getting enough blood.
Elevate it. This can help draw fluid away from the injury. Try to keep your lower leg higher than your hip as much as possible during the first 48 hours after the injury.
Shorten the muscle. For the first couple days after the injury, heel pads can raise the heel, shortening the muscle to reduce the strain on it.
Try an NSAID. An anti-inflammatory like ibuprofen or naproxen can help.
Work on flexibility. Stretch the gastrocnemius by sitting on the floor with your leg straight out in front of you. Pull your toes and foot back, hold for several seconds, and relax. Repeat 10 times. To stretch the soleus, sit on the floor with your knees bent. Support yourself with your hands behind you as you lean back, lift your leg and point your toes toward the ceiling, holding for several seconds. Repeat 10 times. Another good option? Regular yoga practice.
Try This Move
Farmer’s Walk On Toes
More calf strain prevention exercises
See also: Lower Body Strength Training for Swimming
Forearm Strain
You’ll know you strained your forearm if you have pain during activity, especially hand movements, and possibly at night. The muscles of the forearm feel stiff and there could be some swelling. Severe strains involve more pain and loss of strength. Pain can come on gradually (as a chronic problem) or suddenly from a forceful movement (as an acute injury).
What Causes It?
The forearm has a lot more “moving parts,” so to speak, than you think. Along with the radius and ulna, you have more than a dozen muscles and tendons stretching between your elbow and wrist. In the same way that the lower leg deals directly with the foot, ankle, and knee, all of the forearm’s parts work in conjunction with the hand, wrist and elbow. The forearm muscles support constant wrist pronation (rotation so the palm faces down) and supination (rotation so the palm faces up), as well as extension and flexion of the elbow.
Because of that, you can strain a muscle or tendon with overuse over time or abruptly with a forceful movement. Forearm tendinitis is also common with overuse.
Like all strains, forearm strains are graded from 1 to 3. Grade 1 is mild and involves no loss of strength. Grade 2 involves more severe pain and loss of strength. Grade 3 is a muscle-tendon rupture and requires surgery.
Important: Another forearm injury that could be at fault when your forearm hurts is pronator syndrome, which is compression of the median nerve by muscles in the forearm, especially the pronator muscle. A key symptom is forearm weakness that makes it difficult for you to make an “OK” sign with your thumb and index finger. The forearm strain remedies below can also help with pronator syndrome.
Fix It
Employ dynamic rest.
Avoid activities that engage the elbow and forearm, which includes hard gripping. Use lower-body workouts to maintain fitness.
Ice it.
Apply ice to the area for 15 minutes 4–6 times a day for the first two days.
Massage.
A massage technique called myofascial release can help relieve symptoms. Every muscle is encased in a tough, fibrous sheath called the fascia, which can tighten and constrict the muscle. Regular forearm massage can loosen the fascia, allowing the muscle to relax.
Recondition your forearm.
As the pain from the forearm strain improves, you can do some simple exercises to rehab your arm and get yourself back to your normal activities. Here are three.
Tennis Ball Squeeze: Squeeze a tennis ball in your hand. Hold for several seconds and release. Start with a few reps and increase the number as pain allows. If you feel pain, back off.
Arm Rotations: Hold your arm straight out in front of you parallel to the floor and palm up. Make a fist. Turn your fist over as if you’re flipping a pancake. Add reps as the pain allows. As you get stronger, add weight to your fist by holding a light dumbbell, then a hammer and eventually a tennis racket.
Wrist Extension and Flexion Extension: With your arm straight out in front of you parallel to the floor and your palm down, bend your wrist downward. Hold for several seconds. Return to the starting position and repeat.
Flexion: With your arm straight out in front of you parallel to the floor and your palm up, lift your wrist upward. Hold for several seconds. Return to the starting position and repeat. You can also add a light dumbbell (or even a can of beans) to these exercises as you get stronger.
When to Call a Doctor
Most forearm strains or cases of tendinitis don’t require a doctor visit, but for more severe strains you’ll want to go. A doctor can help find out just how badly injured you are and if there are any other injuries or complications that go along with it.
Mild strains usually heal up in a week or two. Grade 2 problems can linger for six weeks. Grade 3 strains will require surgery to repair the rupture. The key with forearm strains is to let them heal completely. They tend to hang around or to come back if you don’t give them enough time to heal and rehab properly. Be mindful of pain as you return to activity and back off when you need to.
Prevent It
For “gripping” sports (as in sports that require a strong grip, such as cycling), you have to condition your arms, especially your forearms. The stronger and more supple your extensor muscles, the less chance you have of pulling a muscle from a sudden force or longer-term overuse. You can add the stretches and exercises above to any workout.
Try This Move
Standing Dumbbell Curl (Reverse Grip)

Grab a pair of dumbbells and let them hang at arm’s length next to your sides. Turn your arms so that your palms face behind you (this is the “reverse grip” which puts more emphasis on your forearms during the lift). Without moving your upper arms, bend your elbows and curl the dumbbells as close to your shoulders as you can. Pause, then slowly lower the weights back to the starting position. Each time you return to the starting position, completely straighten your arms.
More forearm strain prevention exercises
See also: Which Provider Should I See For My Injury?
Hamstring Injury
A hamstring injury higher up on your leg, otherwise known as a proximal hamstring strain, is characterized by discomfort in the gluteus muscle where the hamstring originates, especially during the push-off phase of running and exercise. The harder you push, the harder it grabs.
The hamstring, a set of three muscles running from your pelvic bone down the back of your leg to just below the knee, is divided into three sections: the distal hamstring (the section near the knee), the middle hamstring and the proximal hamstring (the section near the hip). The “pain in the butt” hamstring strain is in the proximal hamstring, and it presents difficulties that are different from those posed by lower hamstring strains.
Strains result from overuse, pushing the muscle too hard or weakness in the surrounding muscles. A mild strain begins as a dull ache in the buttock, and if not treated, it progresses to a sharp pain that prohibits you from using the leg with any power.
What’s worse, the proximal hamstring has a lousy blood supply, which means it takes longer to heal than the middle hamstring does.
Fix It
Stop. As soon as you feel gluteal pain, stop your athletic activity immediately. If you try to push through the pain, you’ll make the hamstring injury worse.
Train smart. Avoid hamstring-loading activities and do intense upper-body and core workouts to maintain fitness.
Ice it. As soon as you can after the hamstring injury, apply ice to the muscle for 15 minutes at a time four to six times a day for the first two days.
Stretch it—gently. After a few days, perform gentle hamstring stretches several times a day (such as the standing hamstring stretch and lying glute stretch). Depending on the severity of the strain, expect a healing time of anywhere from two to eight weeks. More severe hamstring injuries can take longer.
Work it—gradually. As hamstring injury pain subsides, ease yourself back into activity, particularly speed and hill work. If you feel discomfort don’t push it. Also, use the “Prevent It” exercises to rehab the muscle.
Prevent It
Strengthen your glutes. I say it because it’s true: A strong butt is the key to a happy life. Weak glutes create activation problems for the muscles that come off the pelvis and allow pelvic rotation and instability, which can cause hamstring injuries. Add these stretches and exercises (see the tabs to the left or above on mobile) to any workout to build powerful glutes, hamstrings, quads, and hips.
Try This Move
Standing Hamstring Stretch
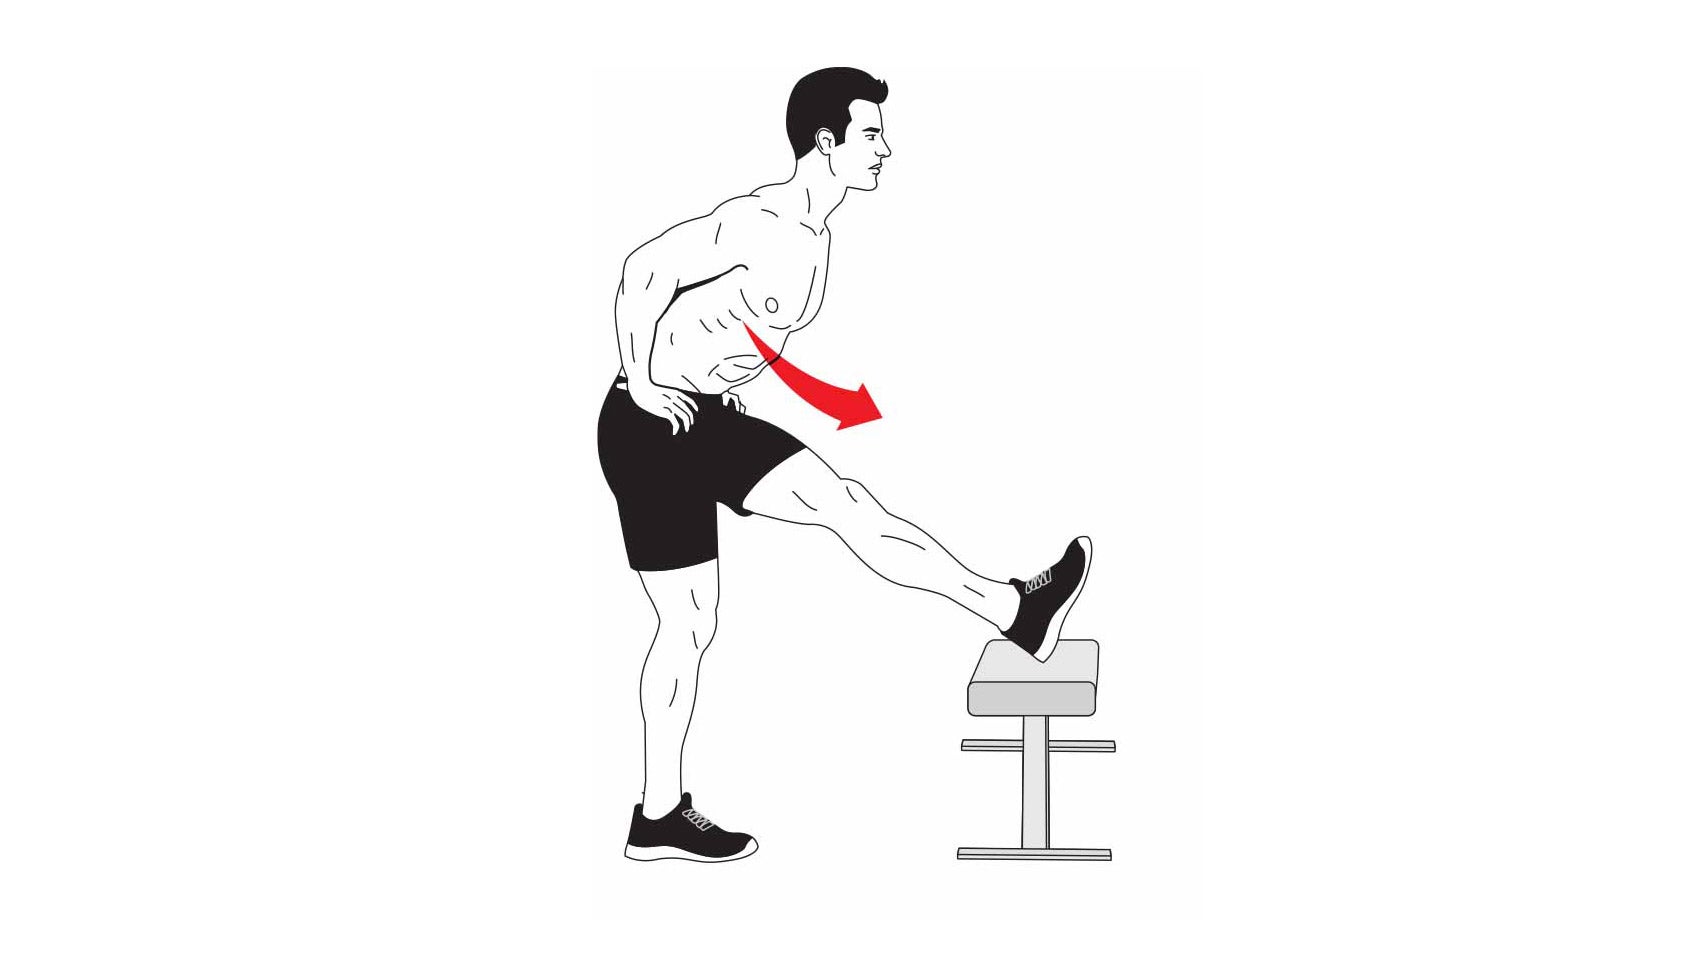
Place your right foot on a bench or secure chair. Your right leg should be completely straight. Your left leg should be slightly bent. Stand tall with your back naturally arched. Place your hands on your hips. Without rounding your lower back, bend at the hips and lower your torso until you feel a comfortable stretch. Hold the stretch for 30 seconds on each side, then repeat two times. Do the routine up to three times a day if you’re really tight.
Note: To target the proximal hamstring, bend your planted knee more to increase the stretch near your hip. Keeping the plant leg straight increases the stretch at your knee. Rotating the toes of your stretching leg outward emphasizes the inner portion of your hamstring; rotating your toes inward emphasizes the outer portion.
More hamstring injury prevention exercises
See also: How to Relieve Tight Hamstrings
Side Stitch
That sharp pain you can get in your side while running can sometimes be severe enough to force you to stop. It can be caused by several things, the most common of which is a diaphragm spasm—especially for runners who are just starting out or pushing a run beyond their current capability. The diaphragm is the muscle that separates the lungs and chest cavity from the abdominal cavity, and it expands and contracts with every breath. When it has to work too hard it can spasm, causing a pain that feels like a knife in your side.
Another common scenario: The diaphragm is working fine, but the breathing effort is excessive due to panting, and the accessory muscles of breathing, the obliques, spasm.
Triathletes face a cause specific to their sport: the stress of transitioning from cycling to running. If the core muscles aren’t stretched after a long bike leg, they may spasm.
Fix It
Stretch it. First, try to relieve the side stitch without stopping your activity.
Raise your arm on the side that hurts and place that hand on the back of your head. Continue the activity. The idea is to allow those side muscles to stretch, hopefully relieving the spasm and, of course, the pain. Try this for 30 to 60 seconds. Repeat if the side stitch returns or doesn’t abate.
If this is ineffective, take a break and stretch those side muscles as you rest. This is a two-pronged attack. One, you stretch the spasming muscles. And two, you rest your diaphragm and obliques, which should solve the problem.
Prevent It
Strengthen your core. Since the most common causes of side stitches are muscle related, increasing core strength with exercises like planks and crunches—especially with rotation (see at right)—often fixes the problem.
Try Pilates. I’m a big fan of Pilates classes for core reconditioning. Adding just two sessions a week to your normal regimen will give you incredible results. No more side stitches is one benefit, but the benefits to your sports performance will be even bigger.
Try This Move
Rolling Side Plank

Start by performing a side plank with your right side down. Hold for 1 or 2 seconds, then roll your body over onto both elbows—into a traditional plank—and hold for 1 or 2 seconds. Next, roll all the way up onto your left elbow so that you’re performing a side plank facing the opposite direction. Hold for another second or two. That’s 1 repetition. For an added challenge, try it on your hands, starting from a high push-up position. Make sure to move your whole body as a single unit each time you roll.
More side stitch prevention exercises
See also: How to Avoid Muscle Cramps