Updated February 19, 2026 05:44AM
If you buy through our links, we may earn an affiliate commission. This supports our mission to get more people active and outside.Learn about Outside Online's affiliate link policy
Upper Body Strength Training for Cycling
Do your shoulders and arms become tired and tight while riding in or out of the aerobars? Use this upper-body weight training routine for cyclists to help decrease your fatigue on the bike and give you more energy during the run.
(Photo: Jeff Nelson)
Target Areas
Triathlon is an endurance sport, plain and simple. So why should you consider strength training a necessary part of a triathlon workout? The short answer is that strength training makes muscles stronger, and stronger muscles can perform longer at higher intensities before they fatigue.
Say you have a really cool muscle car, but it came with a tiny four-cylinder engine, so it doesn’t go very fast or have much power. You take it to the repair shop, where the basic engine is replaced with a big, strong V8 engine. Now you can speed along as fast as you like and have plenty of power to pass slower cars. Your body is just like the muscle car. If you keep the same body but change the engine that moves it, so that it’s stronger and has more power, then your athletic performances will improve and you will pass slower competitors. Strength training creates a more powerful engine than if you were to rely on endurance training alone.
Many strength training programs for cycling focus on the legs, which makes sense because the legs have been assumed to provide all the propulsion. However, a study of basic biomechanics shows that although the legs do push the pedals and turn the crank, they are only able to do so if the upper body provides a base to push against. Newton’s third law of motion states that for every action there is an equal and opposite reaction.
ADVERTISEMENT
In the case of cycling, as you push on the pedals, they push back against you. The only reason the crank turns is that you have a support system at the other end that keeps you from simply standing up each time you push down. Think of how much power you produce, or how hard you can ride, when you are in your normal riding position compared to how hard you can ride when you aren’t holding the handlebars at all. The amount of force you can produce always drops when you let go of the handles because your base of support is gone. It does not require a huge amount of strength to provide this support; merely holding the handles is usually enough, until your legs start to fade and the upper body has to work harder.
In addition, your upper body must support the weight of your torso as you lean over the handlebars, whether in a traditional or an aerobar position. Your lower body is supported by the seat, but the bulk of the work required to hold your upper body in position is done by the arms, shoulders, and back. Increasing the performance of these muscles with cycling-specific exercises will decrease your fatigue during cycling and give you more energy during the run.
These exercises focus on the lower-back muscles (collectively called the erector spinae), upper-back muscles (trapezius, rhomboids), shoulders (deltoids), chest (pectoralis major), triceps, and wrist flexors.
Upper body weight training for cycling
Each exercise provides a target area so you can strengthen your weaknesses.
| Symptom | Cause | Solution |
| Your arms or shoulders become fatigued if you don't use aerobars. | Weak shoulders and/or arms. | Train your shoulders and triceps more. |
| Your shoulders or upper back become fatigued while using aerobars. | Weak shoulders and/or upper back. | Strengthen your shoulders and upper back. |
Back extension
Muscle focus: erector spinae
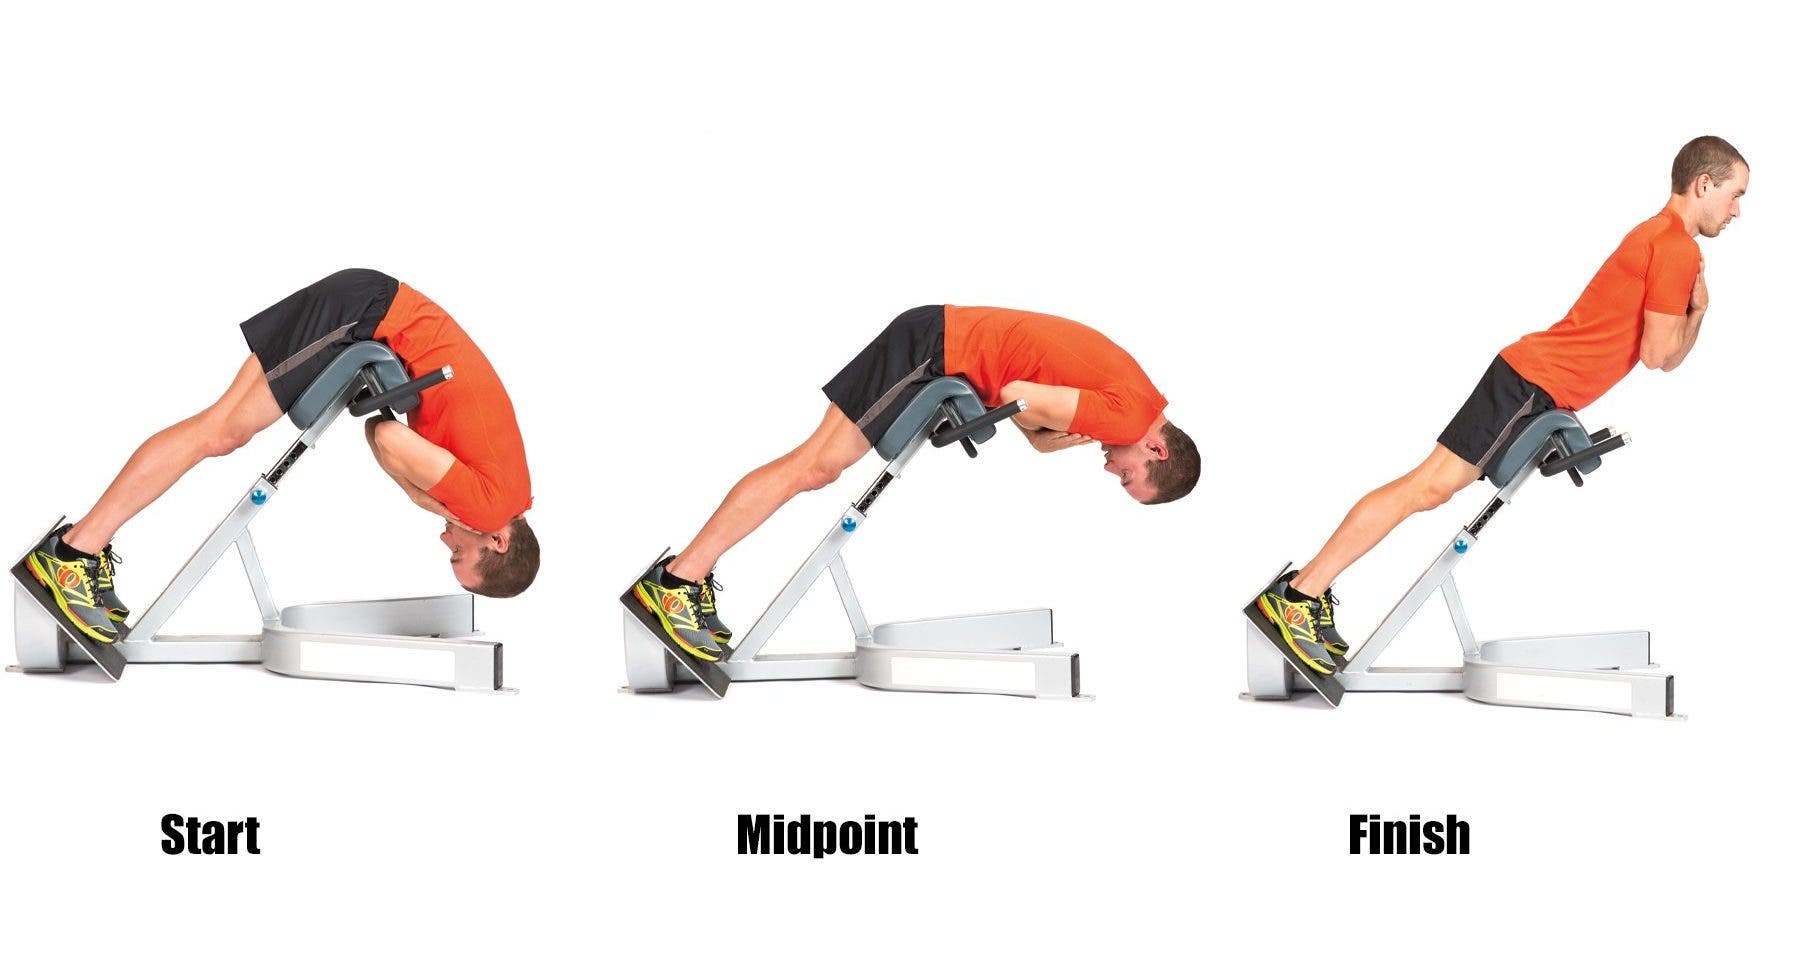
Photo: Jeff Nelson
The back extension exercise is the only one that focuses on the erector spinae muscles, which are responsible for keeping your back straight. As these muscles tire, you start to slouch, which puts additional strain on the rest of your body. Keeping your back straight while cycling helps with aerodynamics and prevents a tight back later, during the run.
Using a 45-degree back extension bench, adjust the height of the thigh pad so that it is just below your waist and allows you to fully bend over without pressing into your stomach. Mount the bench, making sure your heels are set against the heel pads or heel plate that locks your legs so that you don’t fall off. Your legs should remain straight during the exercise, but you may turn your toes out to the sides to relieve the pressure on your thighs. Cross your arms over your chest and slowly lower your upper body over the bench by bending at the waist (see start). The goal is to get as far down as you can, so really relax your back and shoulder muscles.
Starting with your lower back, slowly roll yourself up one vertebra at a time, the way a cat arches its back (see midpoint). It will take some practice to activate these small muscles individually. Do not try to hold your back flat or straight. Your shoulders should be the last part of your back that unrolls. Roll up to the point at which your body is in a straight line (see finish) – any further is hyperextension of the spine, which is undesirable. Hold this position briefly and repeat the motion until your set is complete.
Protraction
Muscle focus: delts, pecs
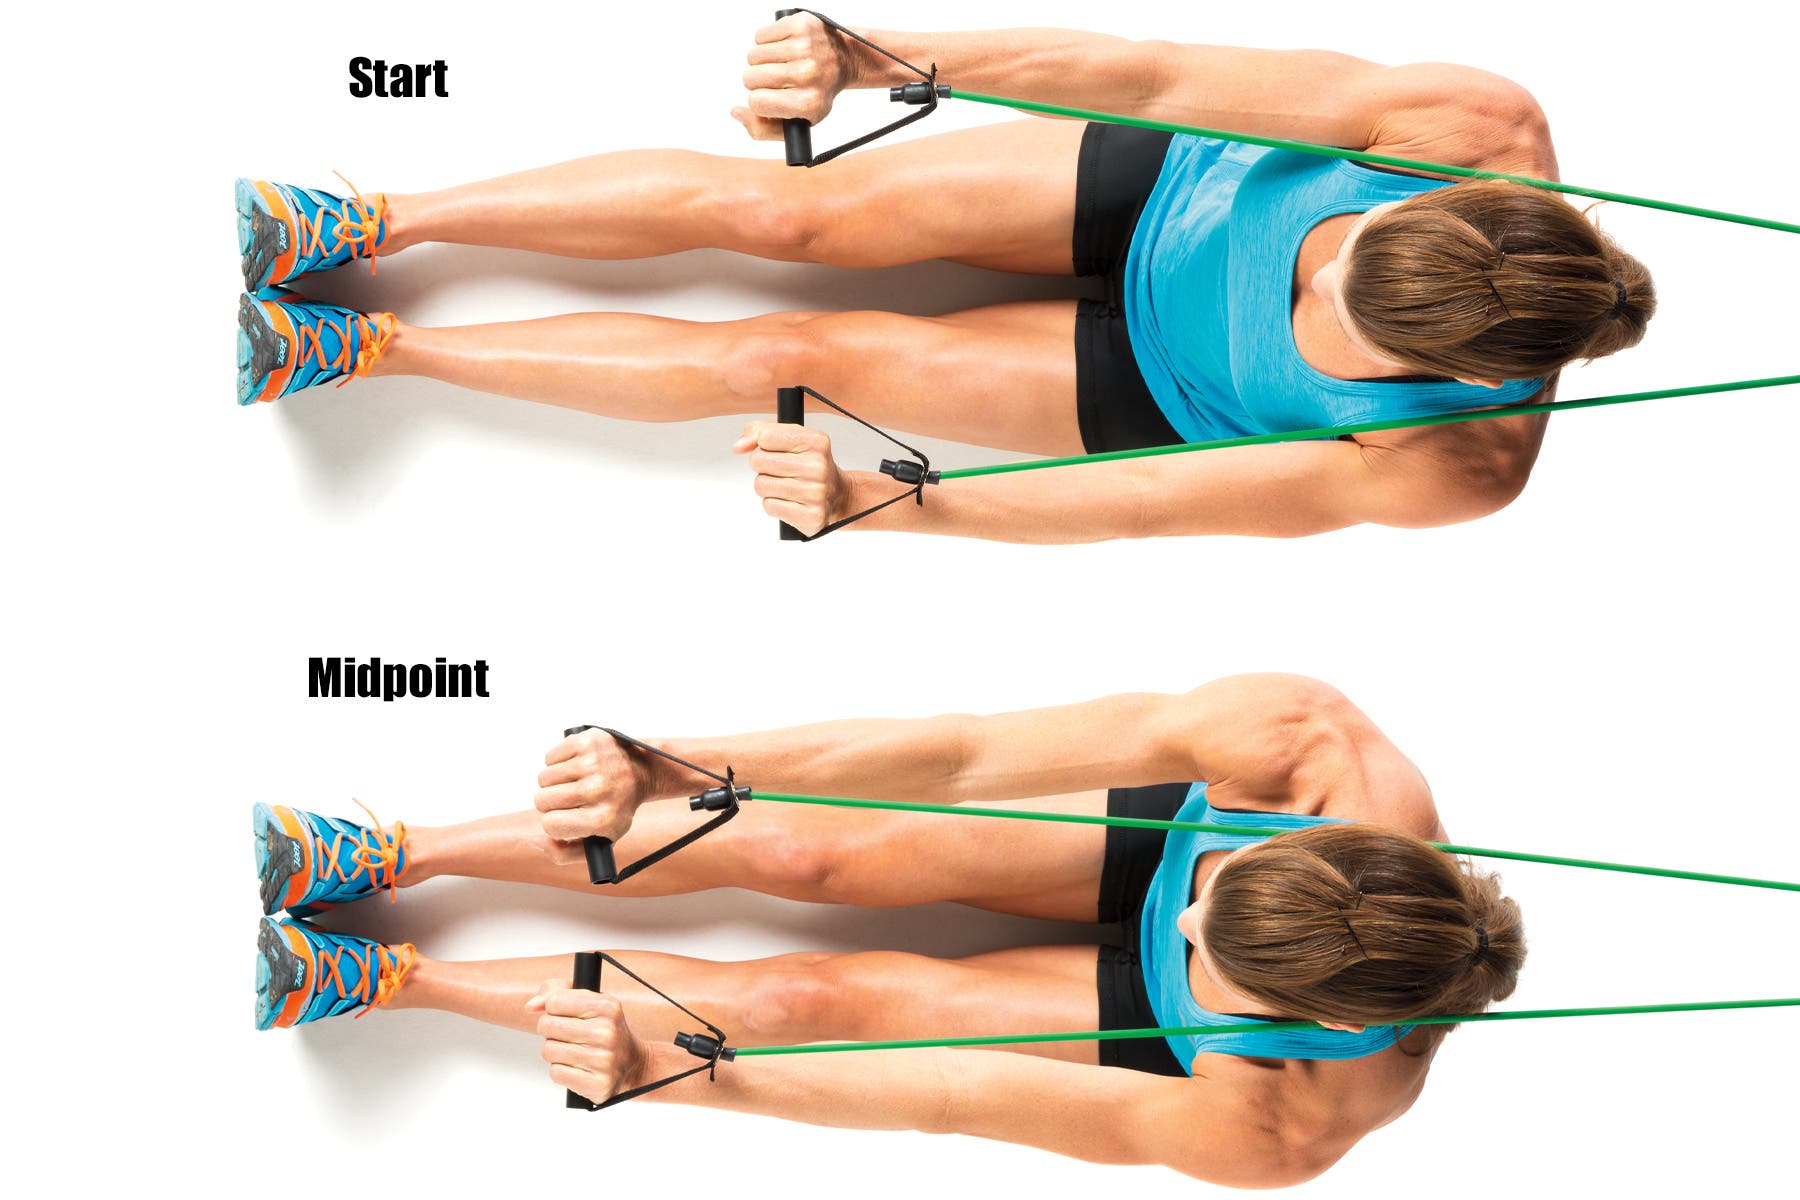
Photo: Jeff Nelson
Protraction is a very small movement, but it is very important for keeping your upper back and shoulders in a strong position during your ride. The pecs and front portion of the deltoids work together to pull your shoulders forward, effectively pushing your back into a straight position and keeping your shoulders from tiring.
Attach a resistance tube to an anchor or wrap it around a pole a couple of feet off the floor. Sit on the floor facing away from the anchor, holding one end of the resistance tubing in each hand. Straighten your arms out in front of you and relax your shoulders to let the tubing pull your arms and shoulders back (see start).
Push out on the tubing handles, bringing your shoulders as far forward as possible. Hold the rest of your body still; don’t lean forward to move the handles. This exercise only takes about 4 to 6 inches of movement, and it all has to come from the shoulders (see midpoint). Now let your shoulders be pulled back again, fully relax them, and repeat until your set is finished.
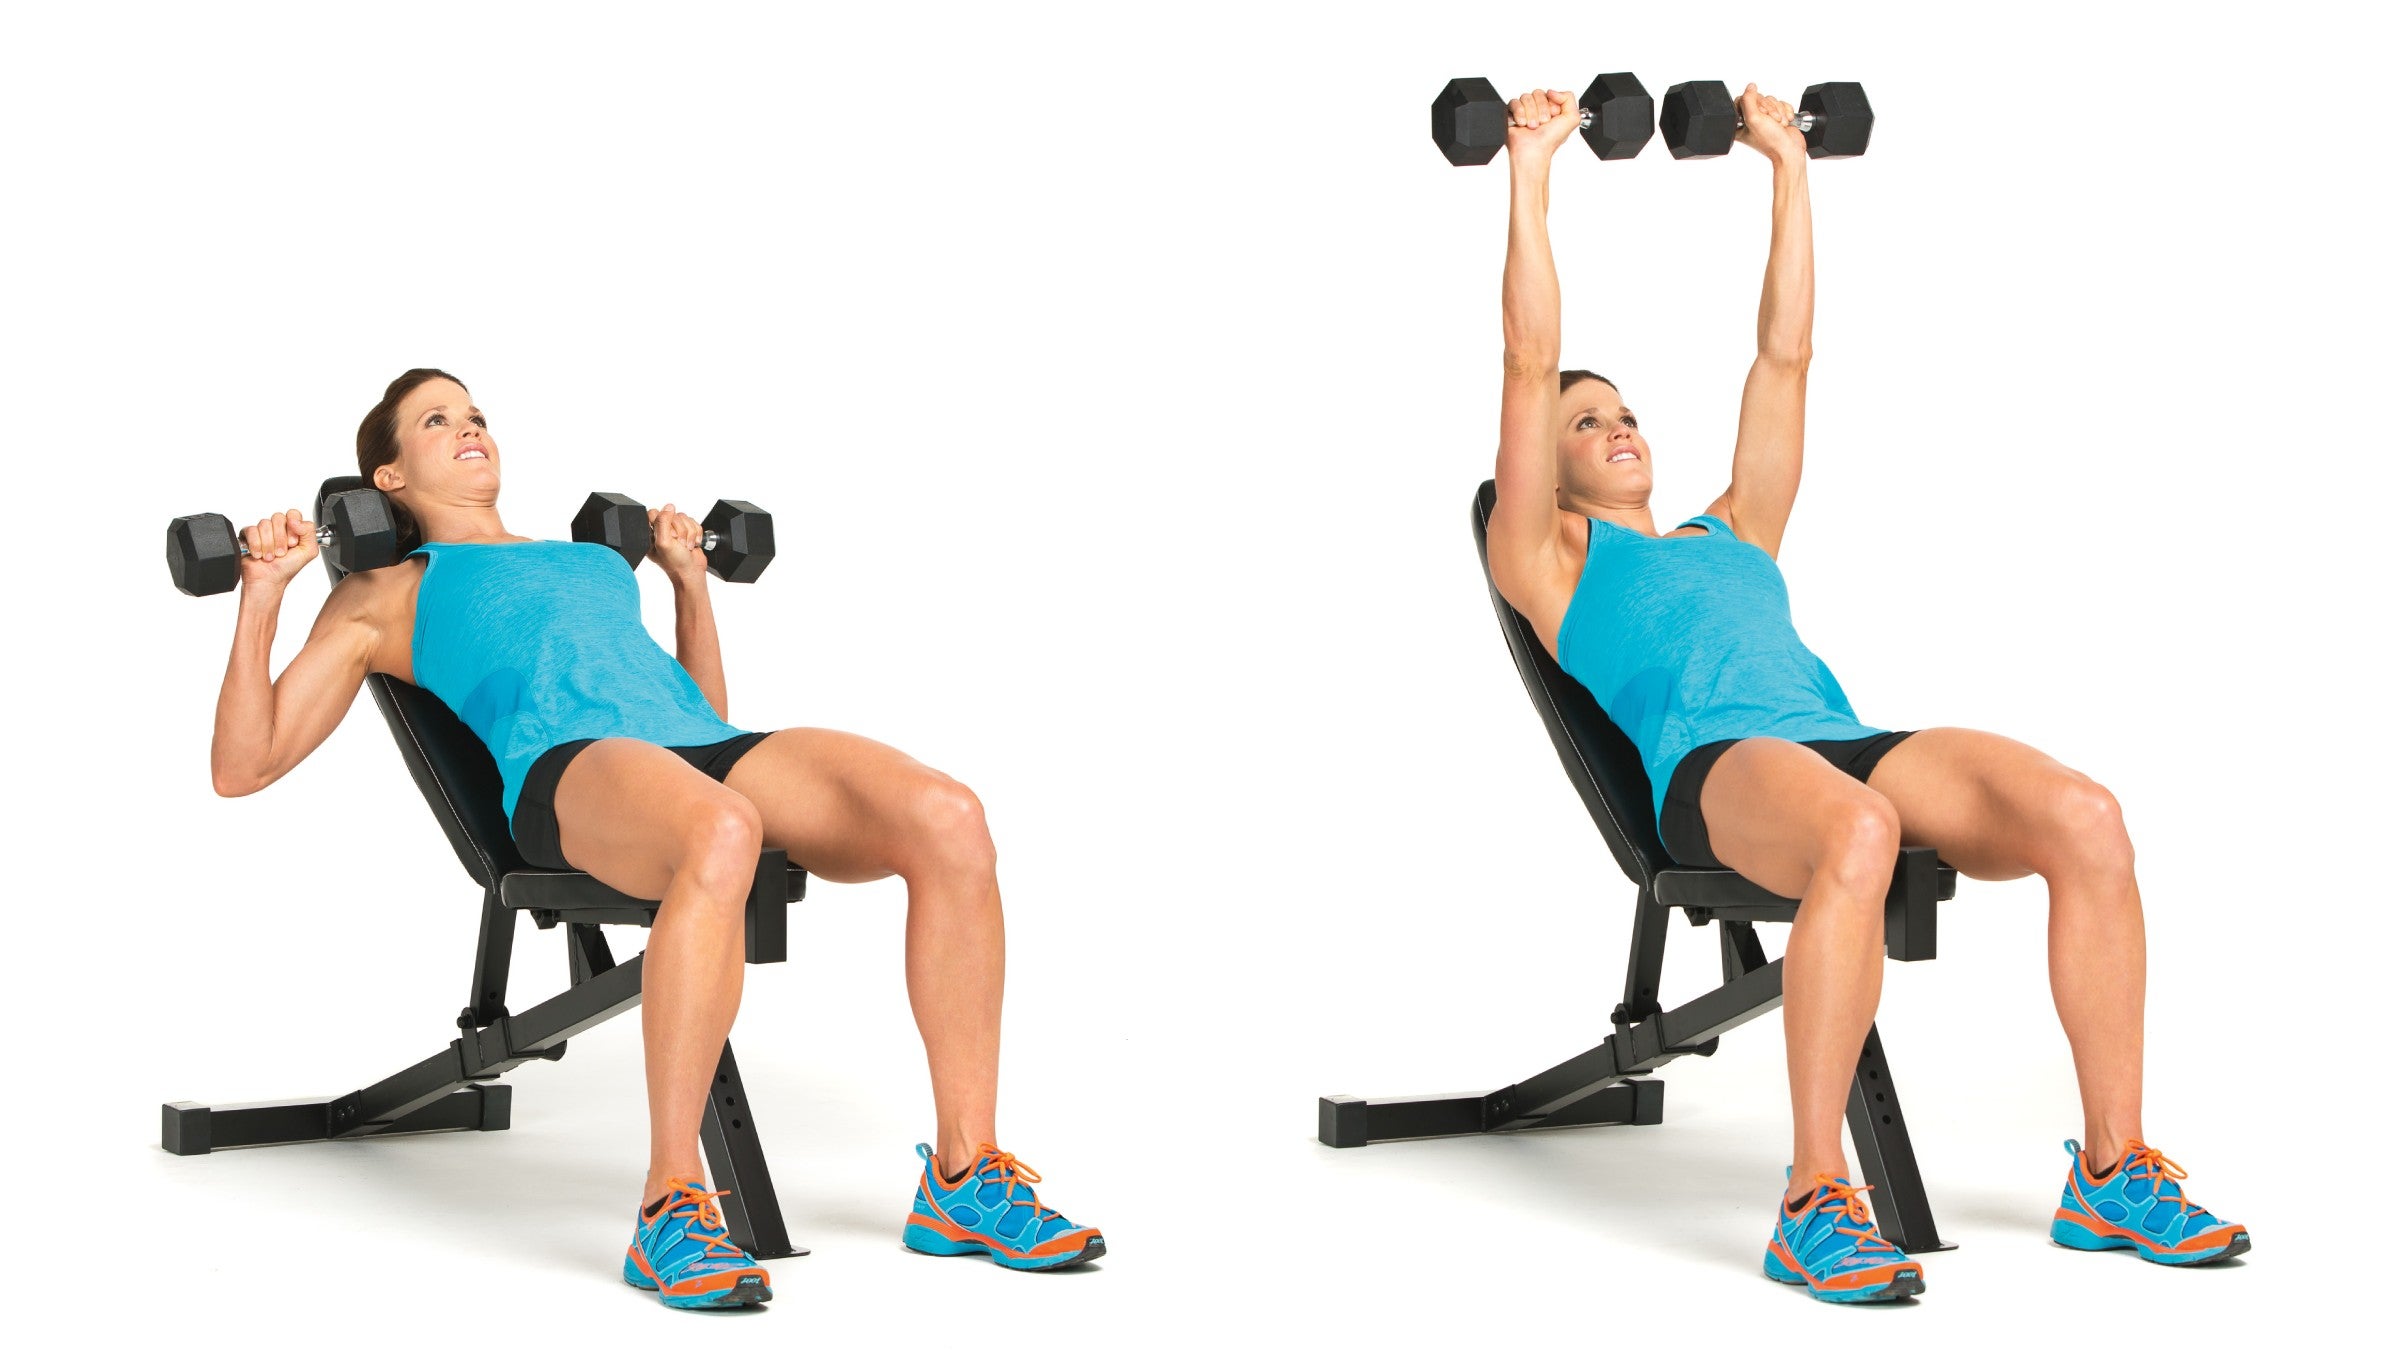
Dumbbell incline press
Muscle focus: delts, pecs, triceps
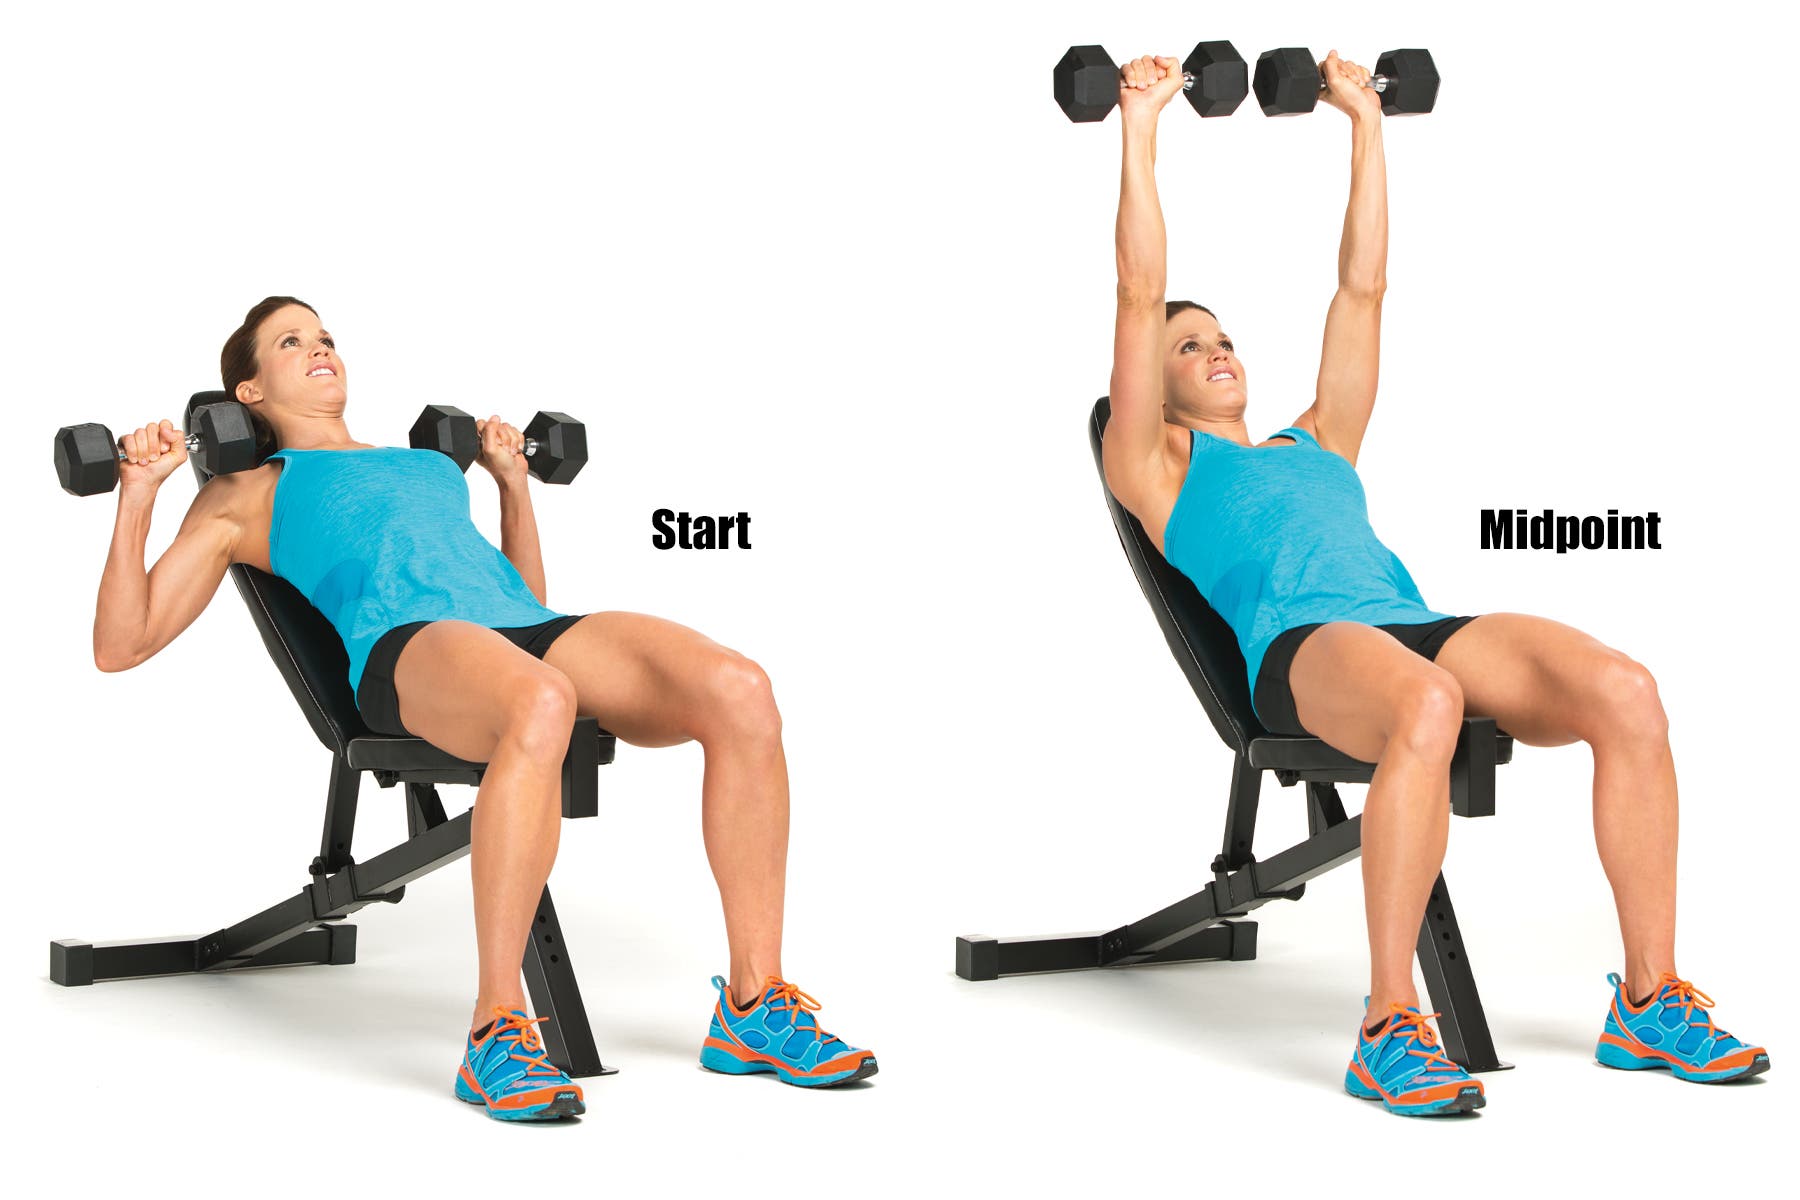
Photo: Jeff Nelson
If your bike is set up correctly, your hands will be positioned slightly in front of your shoulders while on top of the handlebars. This exercise builds upper-body stability by replicating the force that you must counter to hold your body in the correct position.
Holding a pair of dumbbells, sit back on an incline exercise bench. If you are using an adjustable bench, set the angle to about 45 degrees. Position the dumbbells so they are next to your shoulders, palms facing forward, with your elbows pointed out to the sides (see start). Press both dumbbells into the air directly over your head until your arms are completely straight (see midpoint). It is important to keep the dumbbells over your head and not let them stray forward or backward – that wastes energy. Slowly lower the dumbbells back to your shoulders and repeat until your set is finished.
NOTE: You may want to use a spotter for this exercise.
Dumbbell handle push-up
Muscle focus: delts, pecs, triceps
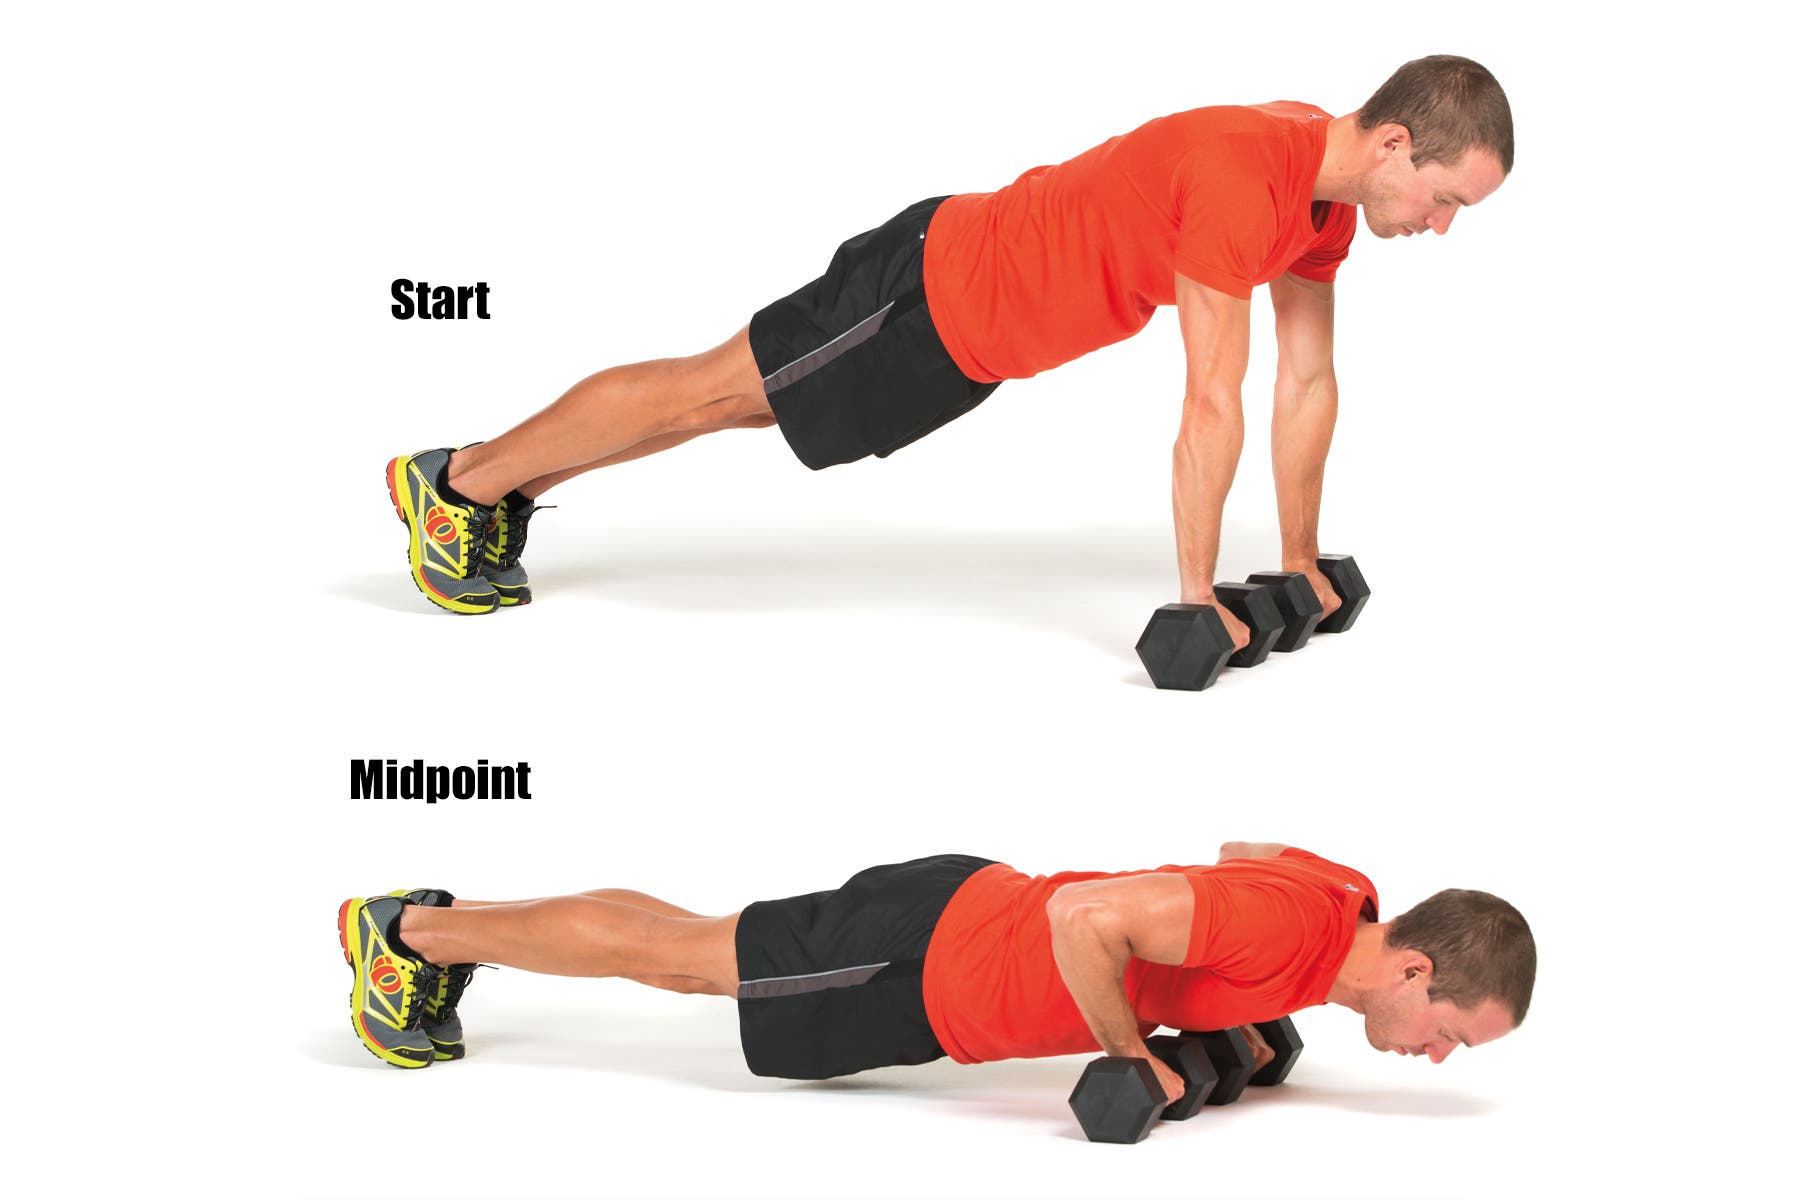
Photo: Jeff Nelson
The dumbbell handle push-up takes a regular push-up and gives it a greater range of motion so that the shoulders, chest, and triceps work more. Sometimes during a ride, especially while facing a strong headwind, you may drop your body lower over the handlebars to create a more aerodynamic position. This exercise helps you hold that position and then push back up out of it when you need to.
Place a pair of dumbbells on the floor in front of you. Get down on your hands and knees and grab the dumbbell handles, positioning them so they are lined up horizontally (perpendicular to the length of your body) and your hands are positioned on the weights directly under your shoulders. Your palms will be facing your knees. The farther apart your hands are, the less effective and sport-specific this exercise becomes. Stretch out your legs behind you and put your feet next to each other or no more than a couple of inches apart. Your toes should be the only part of your body touching the ground. Keep your body rigid and maintain a straight line with your shoulders, hips, and feet (see start). Don’t let your hips sag, and don’t stick your buttocks up in the air; your entire body must move together and be straight as a board.
Slowly lower yourself toward the floor by bending your arms until either your chest comes in contact with the floor or your shoulders are lower than your elbows (see midpoint). Don’t go down so far that you are lying on the floor; just get close and then push yourself back to the start position. It helps to breathe in as you lower yourself and breathe out as you push back up.
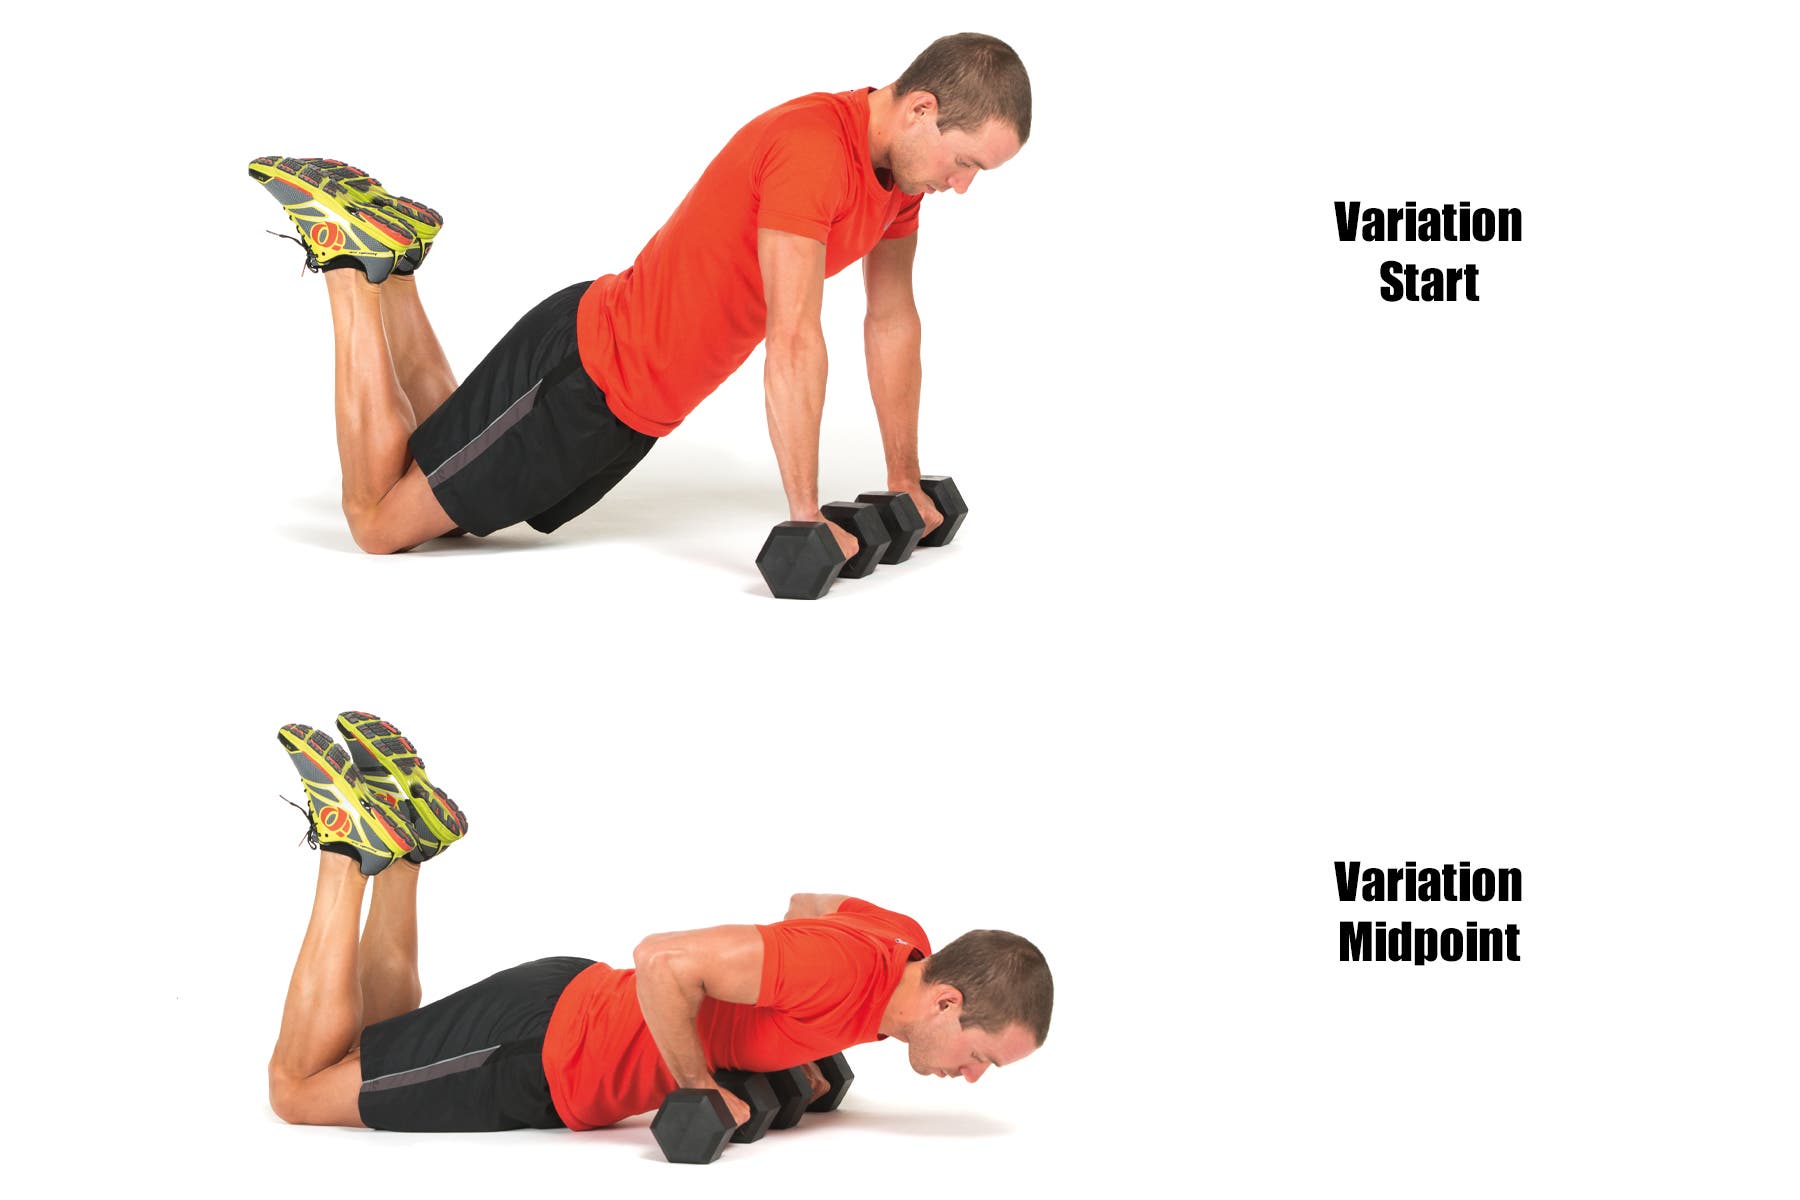
Photo: Jeff Nelson
If you have trouble completing a push-up in this position, you can do a modified push-up on your knees rather than your toes (see variation start). In this position, you’ll keep your body rigid with shoulders, hips, and knees aligned in the modified position (see variation midpoint).
This is a body-weight-only exercise. Do not attempt to make it more difficult by placing weights on your back. If you want to make it harder, wear a proper weighted vest or do more reps.
The push-up, and its variations, is one of the most basic body-weight exercises; yet it is often a difficult exercise for many athletes. As you gain muscular endurance in this exercise, decrease the rest between sets.
Shoulder dip
Muscle focus: rhomboids, trapezius
Photo: Jeff Nelson
The shoulder dip gets right to the muscles of your upper back, which tire easily if they aren’t trained. The trapezius and rhomboids keep your shoulders in a stable position during your ride, and this exercise forces them to do all the work.
Use a dip stand specially made for doing dips. Use the steps provided to get up to the start position. Place a hand on each of the dip stand arms, palms facing each other. It is best to grasp the bar with your thumb on one side and your fingers on the other so that your hand can’t slip off. Press yourself up until your arms are completely straight and step off the stand. Now keep your arms straight and let your body sag between your shoulders (see start). This will cause your shoulders to move up toward your ears.
Keeping the rest of your body and your arms motionless, push down on your hands and raise your entire body up a few inches. Your shoulders should move down as your head moves up (see midpoint). This exercise only takes about 3 to 4 inches of movement, so do it slowly and concentrate on pushing your chest out and pulling your shoulder blades back. Once at the top of the movement, lower yourself back to the start position and finish your reps.
Dumbbell front raise
Muscle focus: delts
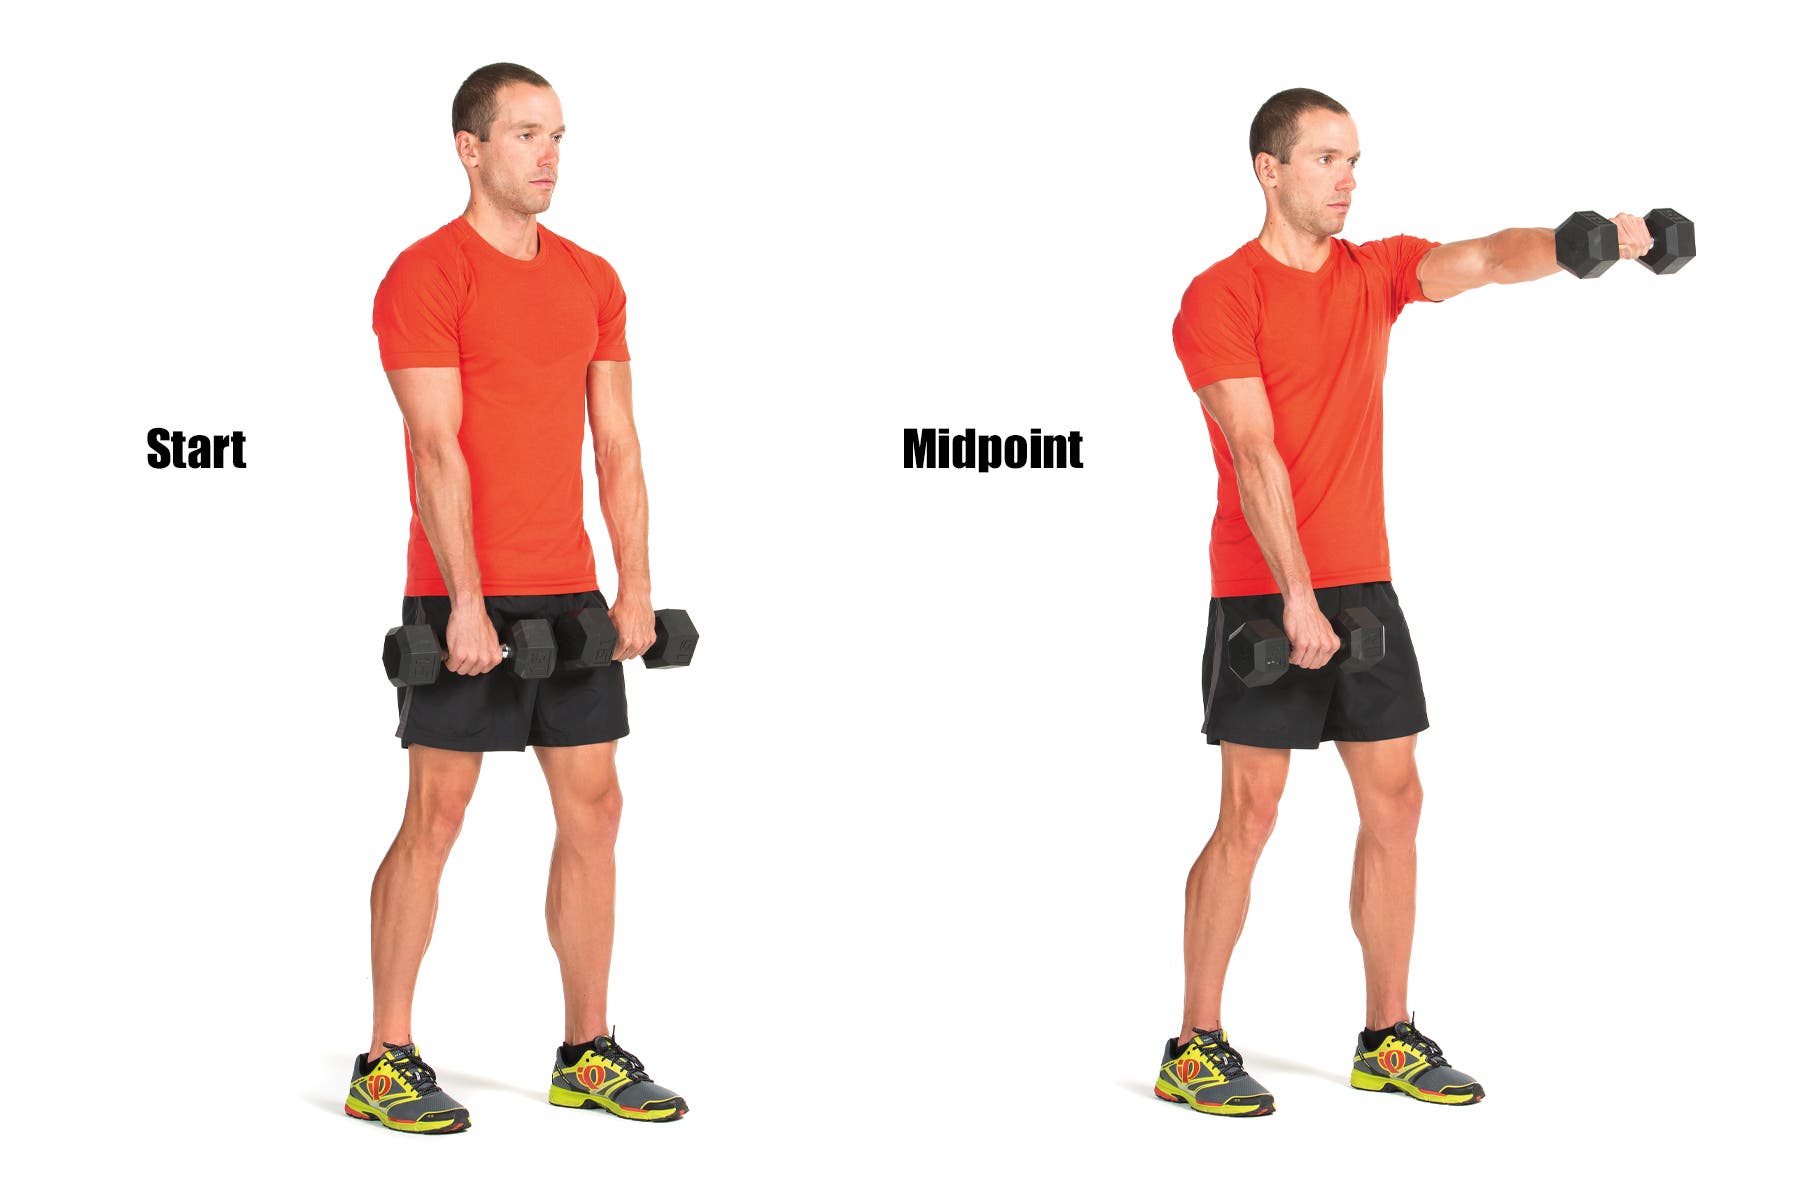
Photo: Jeff Nelson
The front raise is designed to make sure your shoulders are strong enough to support your upper body while on your bike. When you are bent over the handlebars on the bike, your shoulders have to bear the brunt of your upper-body weight and maintain proper position.
Stand with your feet shoulder-width apart, one foot staggered in front of the other for stability. Hold a dumbbell in each hand, with your palms facing your legs (see start). Slowly lift one dumbbell straight out in front of you until it is at shoulder height (see midpoint). Your arm should remain as straight as possible throughout the movement. Slowly lower the dumbbell back to your leg, then repeat with the other arm, alternating arms until you have completed all your reps.
Barbell wrist curl
Muscle focus: wrist flexors
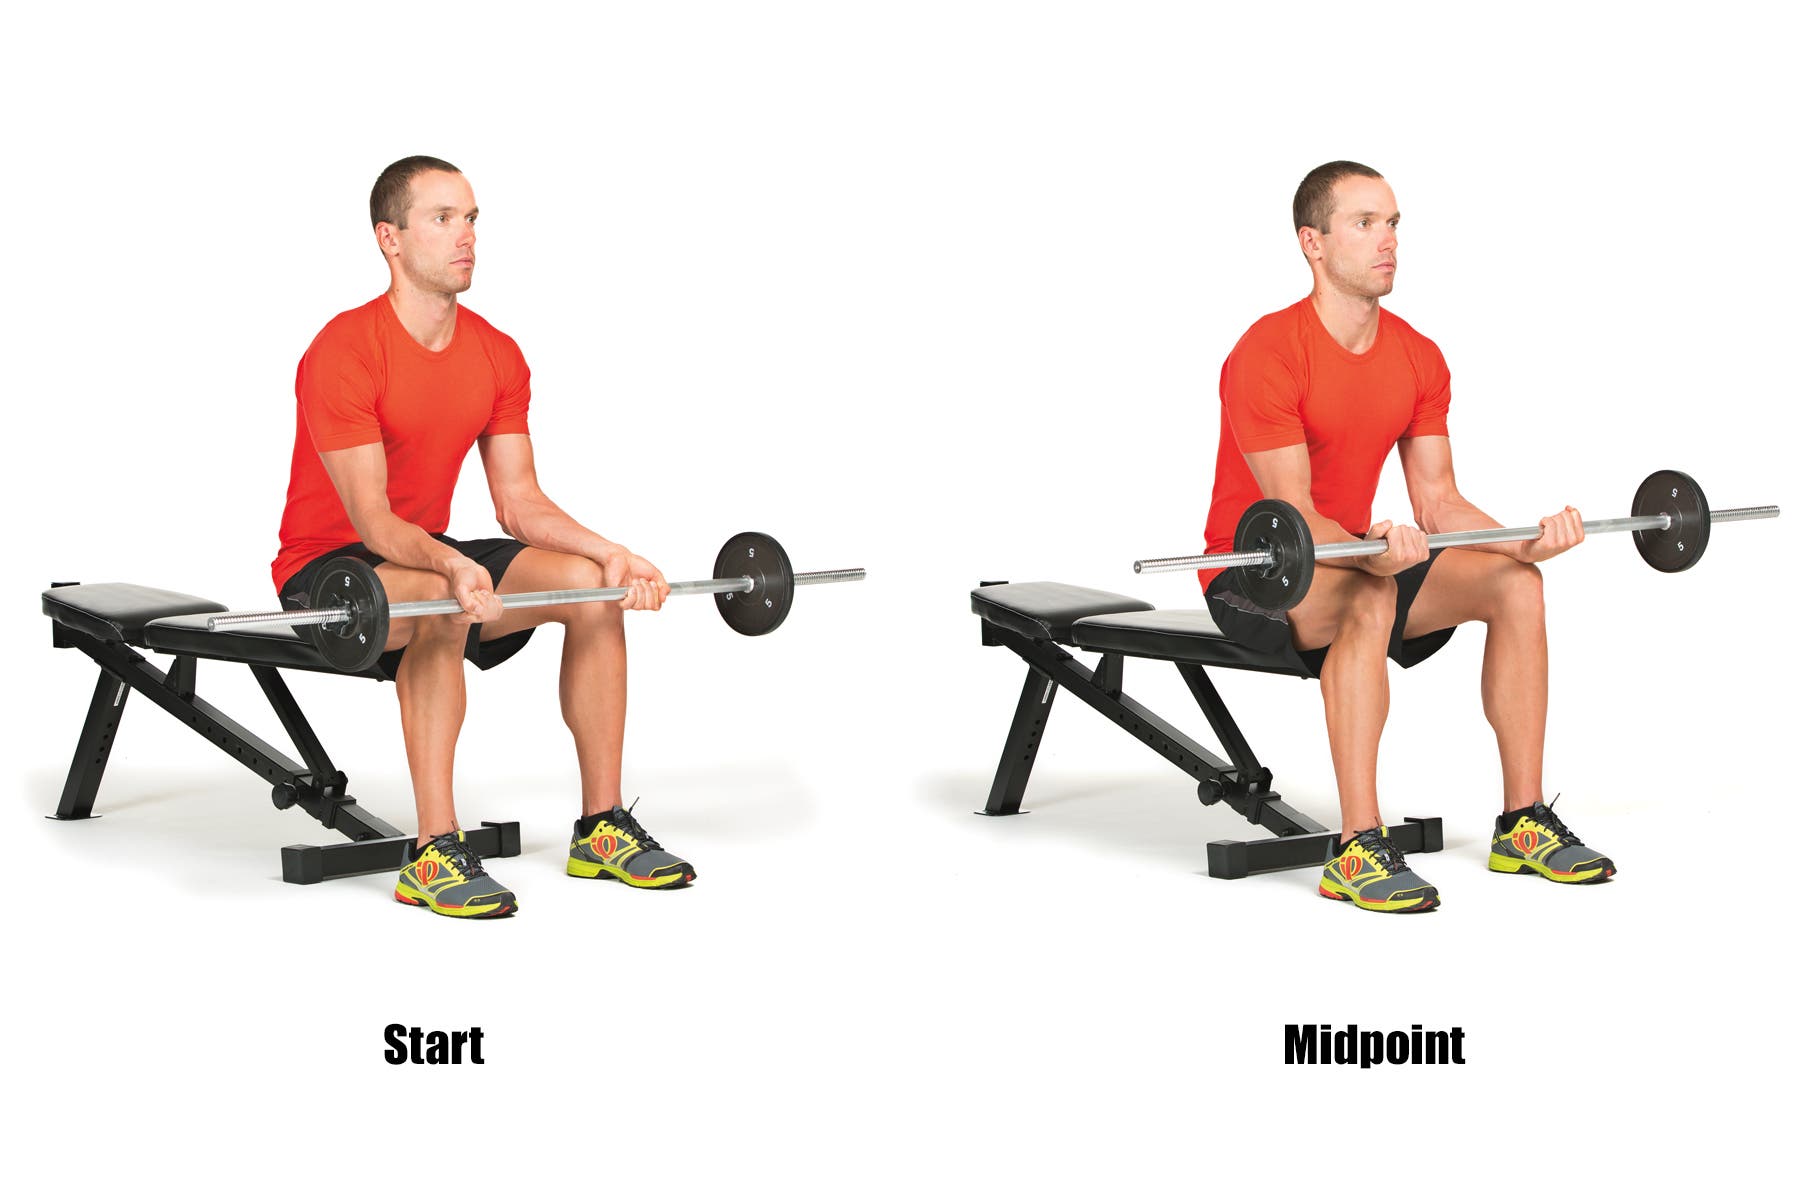
Photo: Jeff Nelson
The wrist flexors, located mainly in the forearms, are often overlooked in training for cycling, which is unfortunate because the first muscles that have to work to hold you in position on the bike are in your hands and forearms. If you have ever experienced numbness in your hands during a long ride, this exercise will help by training the wrists to stay in a stronger position that allows better blood flow.
Holding a barbell with both hands, with palms facing away from you in an underhand grip, sit on the end of an exercise bench or a chair. Place your feet about a foot apart and lay the tops of your forearms on your thighs so that only your hands hang off past your knees. Adjust your hands so that they are as far apart as your knees. Let your wrists relax down toward the ground while keeping a firm grip on the barbell (see start).
Curl your wrists up as far as you can, pulling with both hands simultaneously. Keep your forearms firmly planted on your thighs during the movement (see midpoint). Let your wrists return to the start position and repeat until your reps are complete.
Barbell front raise
Muscle focus: delts
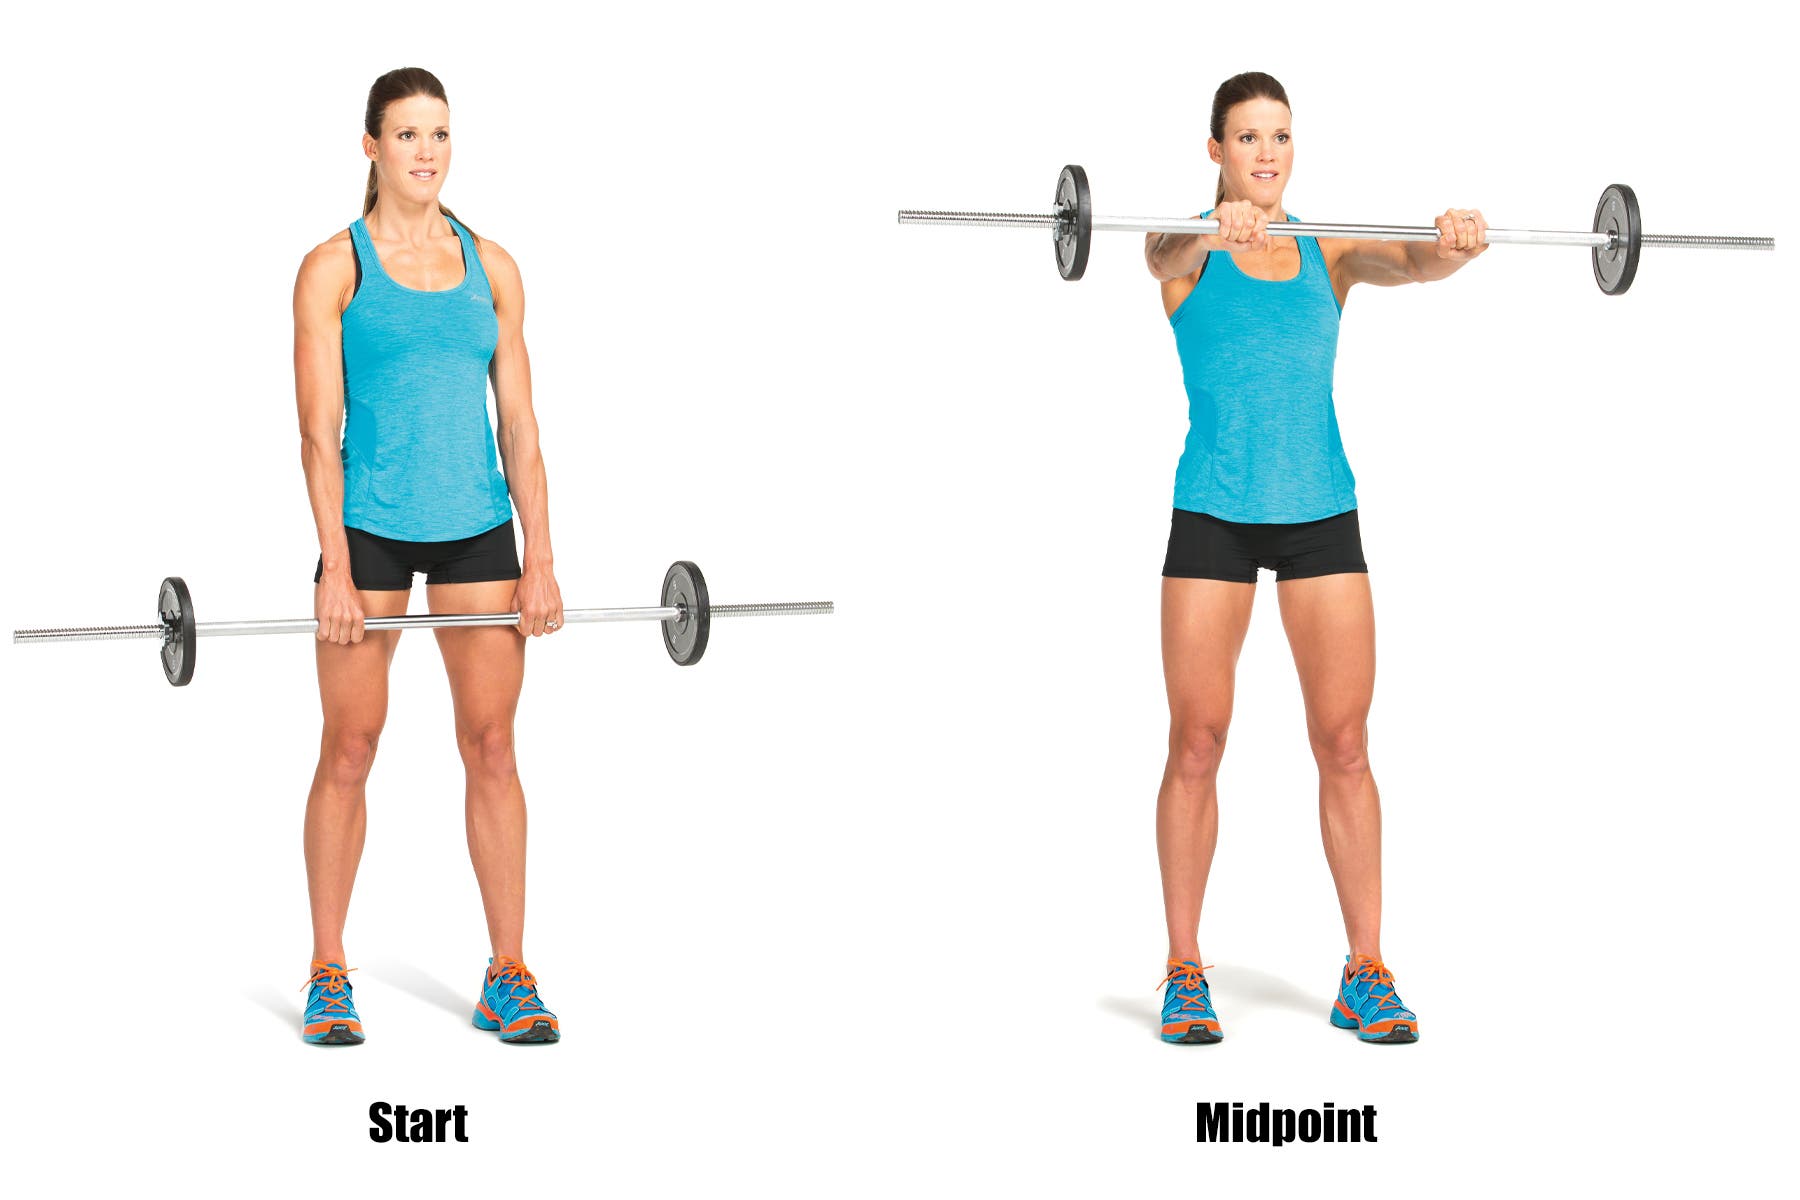
Photo: Jeff Nelson
The barbell front raise targets the shoulder muscles that stabilize the arms while riding, and it mimics the position your arms are in while riding.
Stand with your feet shoulder width apart, one foot slightly behind the other. Be sure you feel very steady and balanced. Hold the barbell down against your thighs with an overhand grip, palms facing your legs. Your hands should be exactly shoulder width apart (see start).
With your arms straight or just slightly bent at the elbows, lift the bar out in front of you until it is at shoulder height (see midpoint). Keep your back straight and don’t let your body sway back and forth. Concentrate on allowing only your shoulders to do the work.
Slowly lower the bar back to your thighs. Do not lower it too quickly; you want to work your shoulders on the way down, too. Repeat the motion until your set is complete.
Bench press
Muscle focus: delts, pecs, triceps
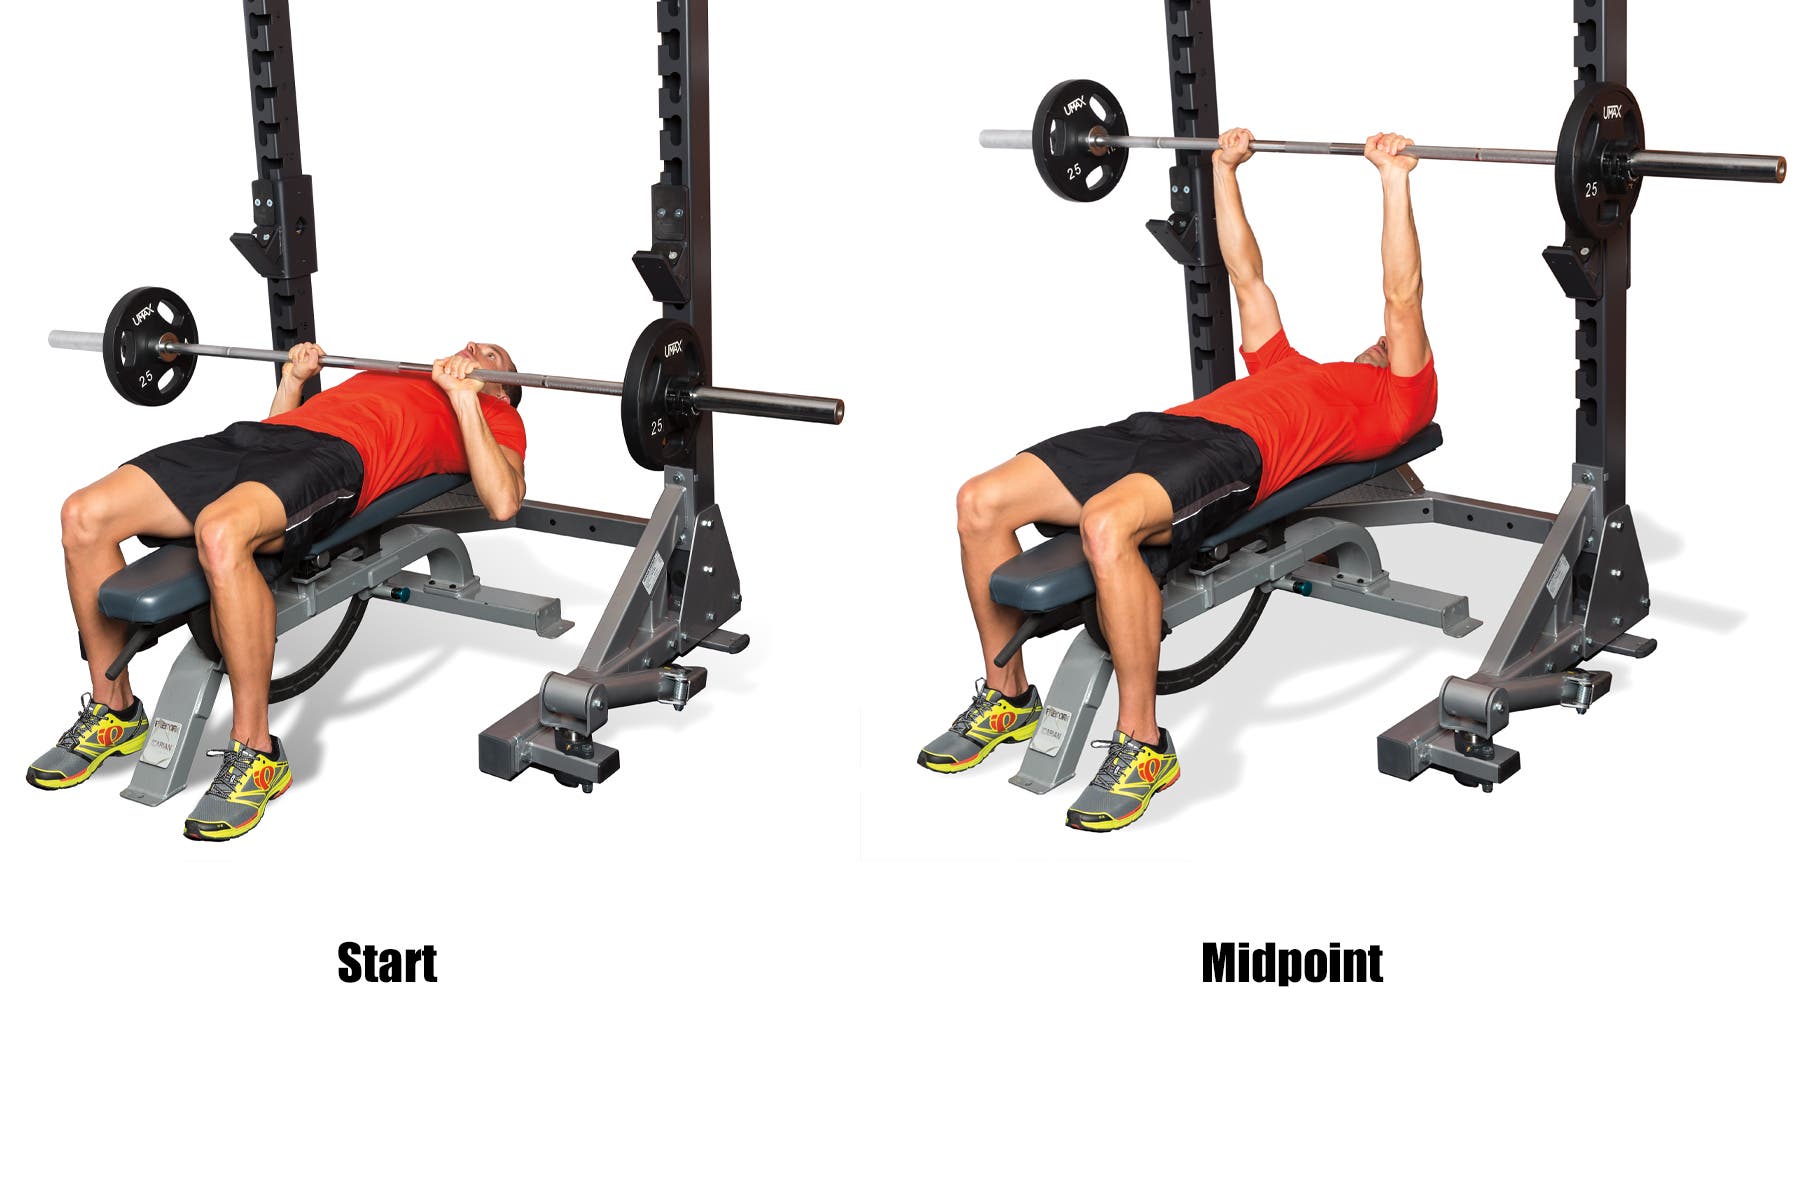
Photo: Jeff Nelson
The bench press may seem like an unlikely exercise for cycling, but if you were to flip it over, you would be pressing down instead of up. When riding, you are essentially pushing down on the handlebars all the time, so the bench press trains all the muscles involved in the upper body while cycling.
Lie down on the bench on your back and keep your feet flat on the floor. (You may have seen people put their feet on the bench, but that creates an unstable and dangerous position.) Place your hands on the bar approximately shoulder-width apart. Positioning the hands wider than shoulder width decreases the effectiveness of this exercise, and a narrower grip will make the triceps work too much. Although there will probably be small marking rings around the bar, ignore them; they are for reference only. Be sure your hands are an equal distance from the middle of the bar.
Lift the bar off its resting hooks and hover it over your chest. Don’t let it move over your head or down over your stomach. There is a point at which your arms will be perfectly vertical and the bar will feel relatively light (see start). Inhale deeply, and slowly lower the bar toward your chest while allowing your elbows to move out away from your body (see midpoint). Keep the bar away from your head and neck! The bar shouldn’t touch your chest – within an inch or so is perfect.
While exhaling, push the bar back up until your arms are straight again. As you push, move the bar in a straight line. If you feel the bar moving more toward your head or stomach, make adjustments to keep it positioned over your chest. Finish your reps until the set is complete.
Overhand curl
Muscle focus: biceps, wrist extensors
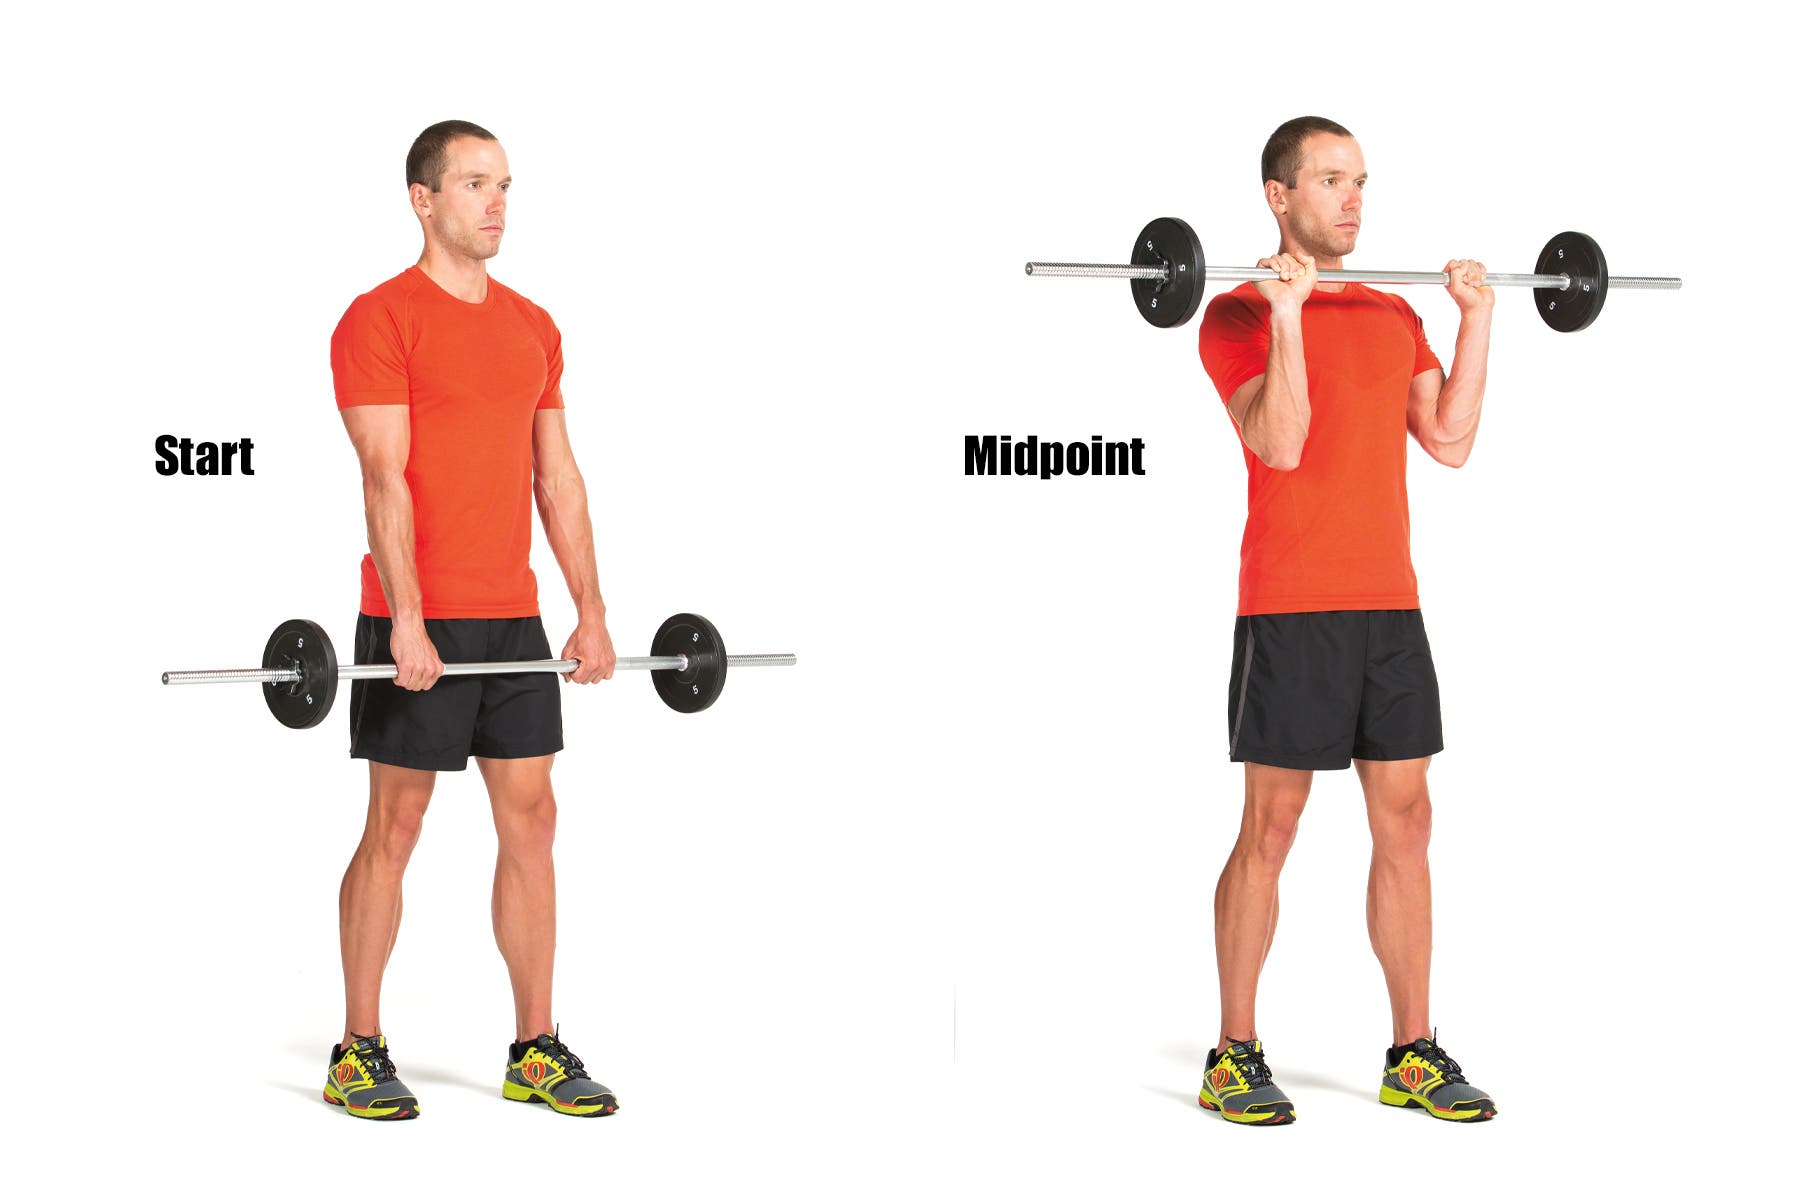
Photo: Jeff Nelson
This exercise again targets the forearms, strengthening them for both holding your arms straight and keeping your wrists strong.
Stand with your feet apart, with one foot slightly in front of the other. Hold a barbell with an overhand grip, palms facing down or toward your legs. Your grip should be evenly spaced on the barbell, slightly wider than shoulder width. Rest the barbell against the front of your thighs, arms relaxed (see start).
Keep a very tight grip on the barbell, and keep your elbows next to your sides. Curl the barbell up to your shoulders, just under your chin (see midpoint). Slowly lower it back to rest on your thighs. Repeat the movement to complete the set.
Adapted from Strength Training for Triathletes, 2nd edition, by Patrick Hagerman, with permission of VeloPress.