Beginner's Guide To Incorporating A Bike Trainer Into Cycling Workouts

Cold, snowy winters or a tight time schedule don’t have to interrupt your training; just turn to the indoor trainer. Indoor trainers don’t limit your bike training. In fact, even beginner athletes in the sunny climes should log some time on a bike trainer. A trainer is more specific than a spin bike, a stationary bike, a recumbent stationary bike and on down the list of pedaling actions that move further and further away from the training principle of specificity.
The Right Bike Trainer For Beginners
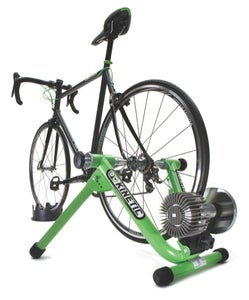
A bike trainer is a device that clamps onto your rear axle and presses a resistance roller against the rear tire so that you can ride in place. They come in three basic categories:
Wind trainer: Less popular today and thank goodness, as the resistance generated from its small fan isn’t as loud as a 747 at takeoff, but it’s far from silent
Mag trainer: A bit more expensive and quieter
Fluid trainer: More expensive and quieter than its Mag brethren
Smart trainer: A trainer that connects to your computer or smartphone to control resistance, provide feedback, and control a virtual cycling avatar online
Most of today’s bike trainers are durable, even for a beginner who might not be used to using them. A trainer is a worthwhile investment and a device that will serve you well for years to come. Buy a steel skewer for your rear wheel so that the bike sits more securely in the trainer’s clamp, but most new trainers come with this. Direct drive trainers will attach directly to your drivetrain after you remove your wheel to prevent tire wear, give a more solid pedaling platform, and reduce sound. Also buy a wheel block that raises the front wheel, leveling off the bicycle—but this can be faked with something like a phone book.
Why Would A Beginner Need A Bike Trainer?
- For a great workout: There are no interruptions on a trainer like there are on the road—no stop lights, no delays. Just get on and go! This adds value to the ride, so a 50-minute ride on the trainer is equal to an hour outside.
- For safety: With more distracted drivers on the road today, riding outside can be dangerous. Also for areas that require a long ride out to a safe area, a bike trainer is a great way for a beginner to quickly get to the “meat” of the workout.
- For convenience: Rather than getting everything ready for a long ride outside, an indoor setup requires less prep once it’s set up. For easier rides, some indoor riders can multitask by catching up on movies, listening to an audiobook, or even reading. A good bike trainer can pack up small and store out of the way when not in use.
Indoor Bike Workout Structure
The same applies here as in any workout, but for beginners on a bike trainer, follow this basic pattern:
- Start with a warm-up of 10-12 minutes.
- Put in some technical focus for three to five minutes.
- Perform the main body of your workout.
- Finish with seven to 10 minutes of cool-down.
Sample Beginner Bike Trainer Workouts
Three rides a week like this will keep you in shape and improve your bike ability:
Drill Ride
The main body consists of four sets of 30-second one-footers, with two minutes of recovery. To perform a one-footer, remove one cleat from the pedal and rest that foot safely on the frame of the trainer. Concentrate on 30 seconds of smooth, fluid circles using just one foot. Switch feet and take two minutes of easy spin with both feet as recovery. The next drill is four 30-second spin-ups with two minutes’ recovery. To perform a spin-up, start at 90 rpm in a moderate gear. Gradually increase your cadence to 95, 100, 105 rpm and so on while still in that same gear. After 15 seconds of increasing cadence, get to your fastest spin which is still very smooth (no hopping around in the saddle) and hold that for 15 seconds. Take a full two minutes of easy circles between each for recovery.
Interval Ride
After a solid warm-up, shift into a higher gear and commit to going very strong for two minutes. You can determine how intense that effort should be with a heart rate monitor, by rate of perceived effort or by breath rate. Then, spin easy for three minutes. Start with three rounds, and as fitness develops, go to four or five rounds. After that, increase the duration of the effort. Eventually, reduce the recovery time.
Steady State
After a solid warm-up, settle into a pace that will last 15-30 minutes. Make this a challenge, but not nearly as intense as the effort in the interval ride. Again, use either heart rate, perceived effort or breath rate to decide on the intensity. Hold this effort steady and strong for the full duration, and concentrate on good pedaling mechanics. Be sure to leave plenty of time for a quality cool-down.
Ian Murray is an elite-level USAT coach and the writer and host of the DVD box set TriathlonTrainingSeries.com.