Updated July 10, 2025 01:47PM
Pro Transition Tricks: Save Seconds By Setting Your Bike Like A Pro
Save seconds by setting your bike like a pro.
Rollison puts her glasses on in T1 then flips her helmet off her aerobars on to her head. Photo: Aaron Hersh
Bring a one-shot tire repair inflator and hide it
Melissa Rollison, 2011 Ironman 70.3 world champion, uses electrical tape to attach an Effetto Mariposa sealant-and-inflator unit between her elbow pads. By stacking it behind her hydration system, she is able to hide it from the wind effectively. Rachel McBride brings a Vittoria Pitstop inflator can tire sealant canister by taping it to her top tube right in front of her seatpost.
Do it yourself: These handy do-it-all tire repair tools are the fastest way to repair a flat and get back on the road. They don’t work on every flat or inflate the tire back to 120 PSI, but they work for most tubular punctures. Tape one to your bike and shield it from the wind by placing it in front of your seatpost or behind a front hydration system.
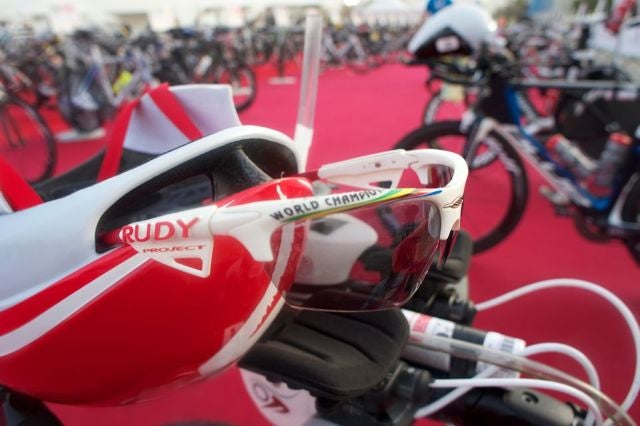
Rest your glasses and helmet on your aerobars
Rollison rests her aerohelmet upside down between an aerobar extension and a brake grip with the tail pointing away from the bike with her sunglasses stuck in the helmet’s front vent. The glasses are oriented right side up. In transition, she grabs her glasses and puts them on rather than leaving them stuck in the helmet then putting them on while rolling. Positioning the helmet upside down on the aerobar puts it at the perfect height to grab in T1.
ADVERTISEMENT
Do it yourself: Show Rollison how it’s done and rack your helmet with the tail pointing toward the back of the bike rather than the front. That way, you can grab it and flip it straight on your head while using your feet to wiggle out of your wetsuit. If you don’t have anything between your aerobars, set your helmet upside down between the extensions. Otherwise, place it between an extension and brake grip. Leave your glasses either in an accessible location to put them on in transition or, if you like to live dangerously, firmly stick them in a vent and put them on while riding away from T1.
RELATED – Tri Gear: Transition Zone
Suspend your shoes for a perfect flying mount
Although the move is only worth a few seconds, pretty much every pro leaves their shoes clipped in to the pedals for a flying mount. Some elect to let their shoes dangle, but many use rubber bands to prop the shoes horizontally so they don’t drag on the ground while running out of T1. This strategy also allows the rider to step straight down on to the shoe rather than having to flick it upright before pedaling away from transition. After one pedal rotation, the bands stretch and snap.
ADVERTISEMENT
Andi Boecherer threads a rubber band through his shoe’s heel loop and around his front derailleur. Eneko Llanos does the same rubber band wrap, but adds some baby powder to his shoe to help the foot dry quickly once its in the shoe. Frederik Van Lierde, on the other hand, makes a crisscross pattern with a rubber band that keeps his shoe more upright and prevents it from bobbing. The added tension also helps the band snap without hesitation.
Do it yourself: Many tri shoes have tiny loops specifically for rubber bands, or you can use the big heel loop to mount the rubber band. If your bands are long or the shoes dangle too loosely, wrap the band through the loop twice. Hang it from your front derailleur on the drive side and rear quick release on the non-drive side.
RELATED: Setting Up Transitions
RELATED: The Dos And Don’ts Of The Transition Area
Stash extra nutrition on the bike
Luke Bell straps a Powerbar to his basebar with simple electrical tape. It sits flush against the deep portion of the bar’s airfoil shape. Rachel McBride tapes gel packs to her aerobar extensions that she can tear off the bar while riding. Ironman Melbourne champ Caroline Steffen sets a small jug of Assos chamois cream on her saddle for a race with an extraordinarily long bike leg. She also keeps pills, presumably electrolytes, taped to her top tube behind her stem. Her gels are stashed in a topless water bottle secured in her rear hydration system, which can be grabbed while ridding without removing the bottle.
ADVERTISEMENT
Do it yourself: Mashing a Powerbar onto the toptube was commonplace about twenty years ago, but there are other, more hygienic ways to bring extra food. Try taping your extras to parts of the frame or aerobars that are both accessible while riding and hidden from the wind by another part of the bike. If you have an extra water bottle cage on your bike, try leaving nutrition in the bottle without a top. And, no littering.