New perk! Get after it with local recommendations just for you. Discover nearby events, routes out your door, and hidden gems when you sign up for the Local Running Drop.
There’s nothing like a good stretch to ease stiff, sore muscles, right? Except when it makes things worse, which can happen if that tender spot is signaling a muscle tear.
Surprisingly, hamstring tears and strains happen quite often to yoga students and athletes because of repetitive overstretching. Overstretching can cause micro-trauma or small tears in muscles, ligaments, and tendons. And once you’re injured, ongoing stretching can prevent recovery, set the stage for chronic or recurrent inflammation and pain and potentially cause further tearing.
Balancing hamstring stretching with strengthening poses builds endurance in muscles and tendons and can make injury less likely. So if you’re already tending to a strain or tear, practicing yoga for a hamstring injury can be beneficial—with some key adjustments.
Anatomy of the hamstrings
Each of the three hamstring muscles originates (attaches) on the sitting bones of the pelvis and runs down the back of the thigh.

There are two hamstrings on the medial (inner) side of the back of the thigh, and one on the lateral (outer) side; all three attach by long tendons crossing the back of the knee to the lower leg. Usually, a bit of mid-muscle discomfort on the back of the thigh won’t cause problems. However, pay attention if you feel discomfort or pain near the sitting bones as you stretch or if you experience pain when you sit for prolonged periods, especially on a hard surface. If this is the case, stretching the hamstrings during your practice could cause microscopic tearing and inflammation and likely leave them sorer afterward.
Can I do yoga for a hamstring injury?
Short answer? Yes. But if you suspect you have strained or torn your hamstring through excessive stretching, it’s time to consult with a doctor to be sure your movement practices aren’t re-injuring your hamstrings. For current injuries, it may be necessary to avoid stretching your hamstrings for a short or prolonged period of time, which can give the tissues time to recover.
However, you don’t have to stop yoga entirely. You can still practice poses for upper-body strength or quadriceps flexibility, or focus on breathwork (pranayama). Once the injury has healed, you can gradually resume stretching. Start slowly, trying one pain-free stretch at a time. Again, check with a doctor before starting a new movement practice after an injury.
Depending on the severity of your condition, you can still practice strengthening exercises while your hamstrings recover. Strengthening can increase blood flow, which helps promote tissue resilience. However, pain is a sign that the tissues are still too inflamed and won’t be able to bear the load without further irritation.
As your injured hamstring heals—be patient, as it may take several weeks—gradually rebuild your physical practice so that you have a good balance of hamstring-strengthening and stretching.
Yoga poses to strengthen the hamstrings
Each of these individual exercises help cultivate strength and balance the more common hamstring stretches.
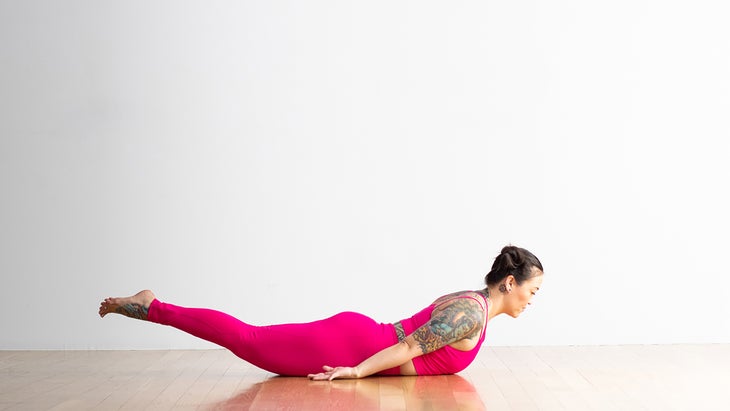
1. Locust Post (Salabhasana)
This posture activates the upper hamstrings near the sitting bones, an area that is particularly prone to strain and can benefit from strengthening.
How to:
- Lie on your belly with your feet together. Rest your arms alongside your body with your palms facing up. Press the tops of your feet into the floor.
- Lift your chest and your legs off the floor in Locust Pose. Roll your shoulders back and stay here for a few breaths. To come out of it, lower to the floor.
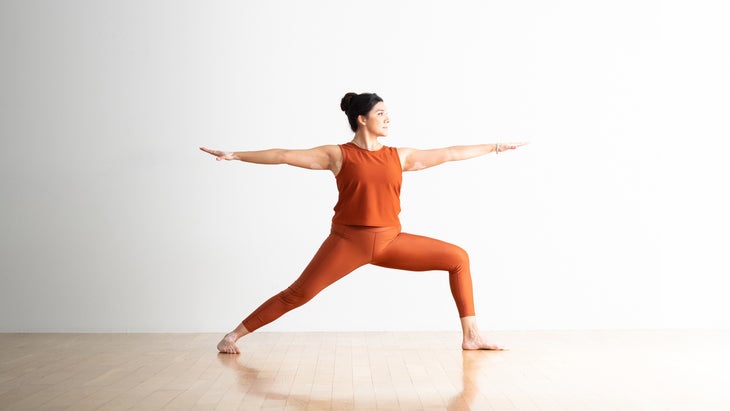
2. Warrior 2 (Virabhadrasana II)
Similar to Warrior 1, the hamstrings of the bent leg activate here. But the varied position of Warrior 2 challenges the hamstrings in a slightly different way.
How to:
- Stand in a wide-legged stance with your arms in a T position.
- Turn your left foot toward the short side of the mat and angle your right foot out slightly. Bend your left knee. Press the outer edge of your back foot to the floor. Stack your shoulders over your hips and reach the crown of your head toward the ceiling. Gaze past your right fingertips in Warrior 2. Stay here for 5-10 breaths.
- To come out of it, press your feet into the floor, then straighten your legs. Return your feet to parallel facing the left long side of the mat. Switch sides.
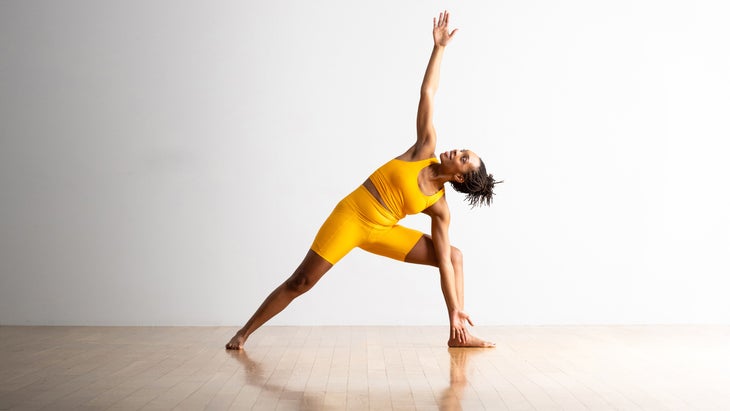
3. Extended Side Angle Pose (Utthita Parsvakonasana)
This pose challenges the hamstrings in the same way as Warrior 1 and 2 with one exception. Leaning forward over the front leg makes it easy to forget the back leg. Press down through the outer edge of your back foot to engage both the hamstrings and quads.
How to:
- Stand in a wide-legged stance with your arms in a T position.
- Turn your right foot to your right side and your left foot in slightly. Bend your right knee. Press the outer edge of your back foot to the floor. Hinge at your hips and reach your side body over your right leg. Lower your right hand to a block or the floor. Reach your left arm over your head with your palm facing down in Extended Side Angle Pose. Gaze forward, at your left hand, or the floor. Stay here for 5-10 breaths. To come out of it, press your feet into the floor as you rise to standing. Switch sides.
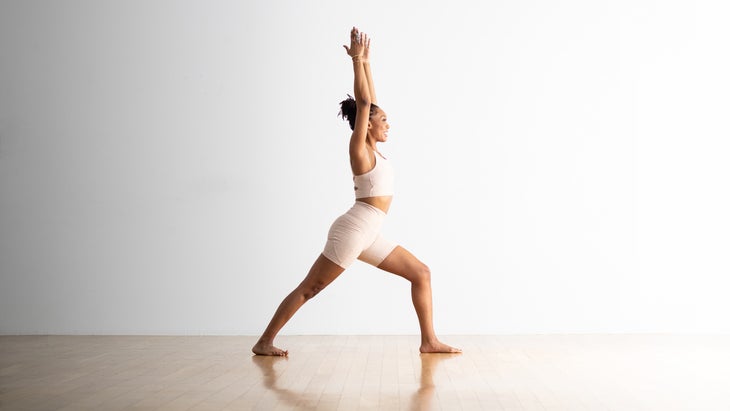
4. Warrior 1 (Virabhadrasana I)
The quadriceps of the front thigh activate in Warrior 1, but the hamstrings are working, too, co-contracting with the quads of the bent knee to stabilize the hip and knee against the pull of gravity.
How to:
- From standing, step your left foot forward and slightly to the left. Turn out your right foot slightly. Bend your front knee and draw your left hip back.
- As you inhale, reach your arms overhead with your palms facing each other. Draw your shoulders away from your ears. Press both feet into the floor in Warrior 1. Stay here for 5-10 breaths. To come out of it, step your left foot back to meet your right. Switch sides.
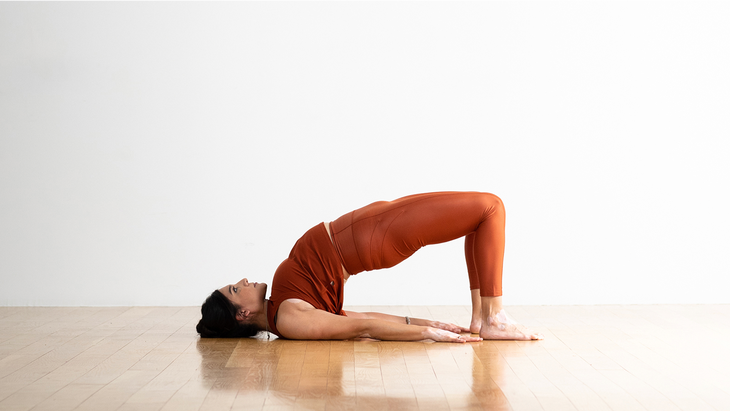
5. Bridge Pose (Setu Bandha Sarvangasana)
The hamstrings work hard to lift the pelvis off the floor and help create a backbend in Bridge Pose.
How to:
- Lie on your back with your knees bent and your feet on the mat, hip-distance apart. Rest your arms alongside your body with your palms down.
- Inhale, press your feet into the floor and lift your tailbone, then your hips off the floor. Press your arms into the floor or clasp your hands under your back. Draw your shoulders beneath you in Bridge Pose. For a less intense stretch, rest your sacrum on a block on its lowest height. Draw your thighs toward each other. Stay in your chosen variation for a few breaths. To come out of it, lower your hips to the floor.
This article has been updated. Originally published April 9, 2021.