Published November 18, 2022 06:00AM
Originally posted onOutside Online
Four Exercises to Injury-Proof Your Achilles
Instability puts strain on your Achilles tendon. Train your body to support your stride from the feet up.
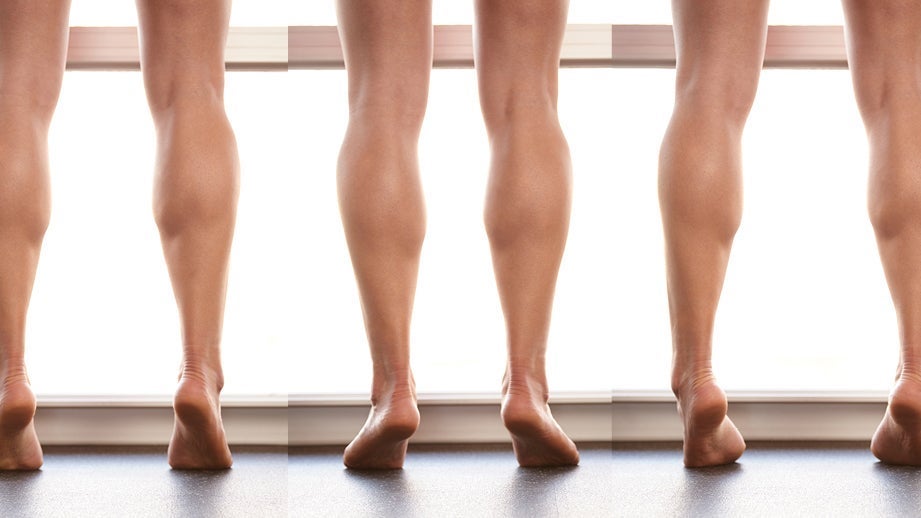
photo: VeloPress
Tendons need a strong, stable foundation. If you don’t have control of your body—the support base of the foot is not stabilized correctly—then the points of attachment shift, and the tendon operates in a longer position. That causes increased strain; the definition of strain is length under load. And too much strain is what creates beakdown within your body and damage in the tendon.
The response to tendon problems is often to strengthen it—and you should definitely do that. The reason the Achilles got damaged was that wasn’t robust enough to begin with. Doing isometrics and eccentrics will create a healing response to improve tendon health—but it won’t fix the foundation. You need to fix both. It is great to improve the density and robustness of the tendon, but that tendon still has to sit on a solid foundation, and that’s what gets neglected.
But we can’t neglect it. You’ve got to learn how to control torsional displacement through your foot. The forefoot and rearfoot need to twist on each other. That twist is controlled primarily by the first ray (big toe). When you do a good job of utilizing your first ray, the pressure goes through the foot appropriately: Your rearfoot twists down to the ground, your forefoot twists down to the ground, the metatarsal heads are nice and flat to the ground, you roll through the metatarsal heads, you push off appropriately—and that Achilles is in a narrow window. It’s happy.
ADVERTISEMENT
Compare that to somebody who has an overly stiff foot; he or she tends to walk on the outside of the foot and the Achilles is in a longer position every stride. Or compare to runners with floppy foot control: Their foot is in a late-stage pronated position, and the tendon is in a longer position at push off. Both scenarios takes the Achilles out of its preferred length/tension relationships. It increases the length of the tissue—that causes shear, and that causes damage.
The following exercises work toward the goal of grounding the big toe to support the foot and improve the control and coordination of your arch, while integrating that control up the chain and throughout your body. You should do control exercises for 5 to 10 minutes, 2 to 3 times per week.
RELATED: An Injury Guide For Triathletes
Achilles Injury Rehab and Prevention Exercises: Single-Leg Shoulder Press
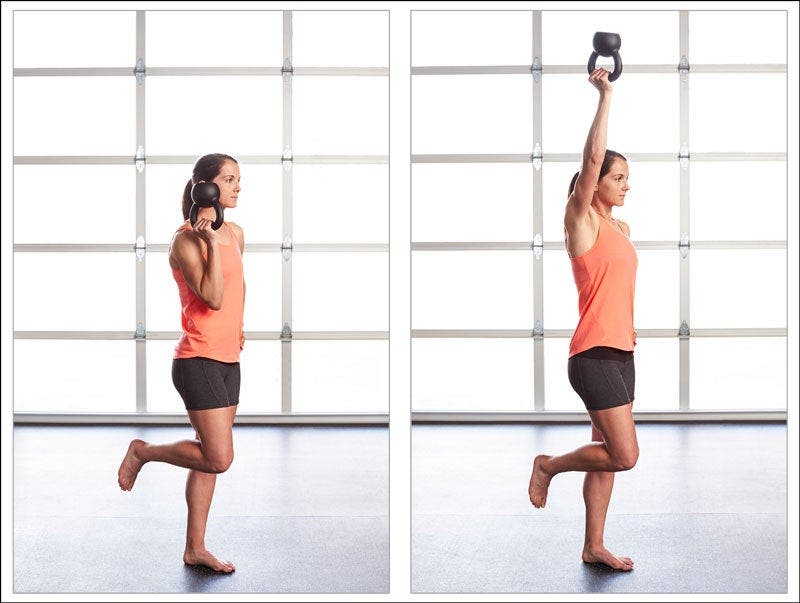
- Stand on one leg, with a relatively light weight (8–10 lbs.) in the opposite hand.
- Dial in your posture, driving your big toe down to set up your forefoot tripod from the inside to the outside of the ball of your foot, and extending to the end of the big toe.
- Press the weight overhead and bring it back down. The added weight creates more instability for you to control with the forefoot.
- As your arm goes overhead, keep your weight centered over the midfoot to avoid leaning back through your heel.
- Do 15 reps on each side.
TIPS: Use a water bottle or milk jug if you don’t have access to weights. If you arch your low back when reaching overhead, try to drop the ribs down in front to keep a neutral spine.
ADVERTISEMENT
Achilles Injury Rehab and Prevention Exercises: Foot Screws
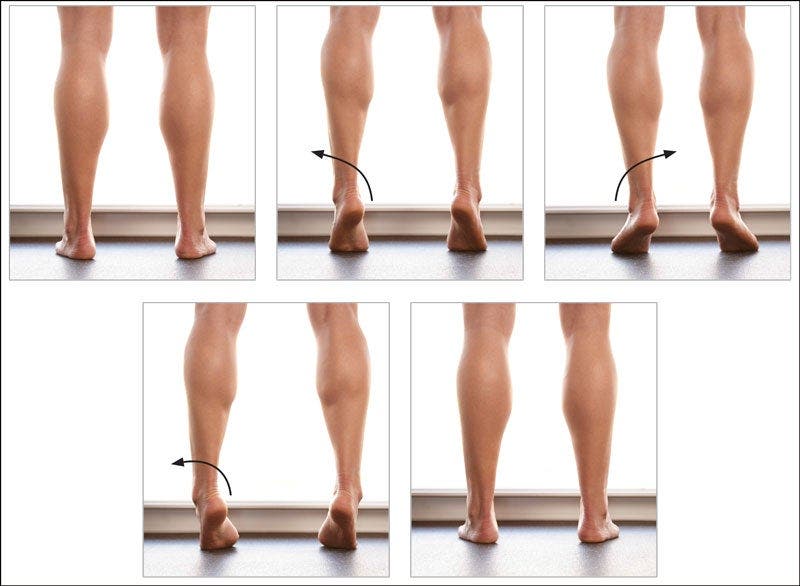
- Stand on both feet, keeping equal pressure across the tripod of each forefoot.
- Twist the rearfoot slightly out while keeping the big toe grounded, then raise your heels an inch or so.
- Staying up on your toes, let the rearfoot twist inward.
- Press the big toe into the floor to push your arch up and screw the heel into the outward position.
- Lower the foot to the floor and relax. This is one full rep. Keep the movement specific and controlled.
- Perform 20 reps.
RELATED: Treatment And Prevention Of Achilles Injuries
Achilles Injury Rehab and Prevention Exercises: Foot Rocks
The following two exercises use a MOBO board—designed with a hollow box under your little toes to prevent you from using a gripping strategy and thus train your big toe to support and stabilize your arch.
This exercise trains you to use your foot properly, to control the twist through pronation and supination. In the secondary rocking axis it gets the peroneals on the sides of your calf, also helping to help ground the first ray to create stability.
This exercise trains you to use your foot properly, to control the twist through pronation and supination. In the secondary rocking axis it gets the peroneals on the sides of your calf, also helping to help ground the first ray to create stability.
While standing with good posture, touch the toe side of the board down to the ground, then the heel side. Ensure the rocking is controlled, as if there are egg shells below and you are touching the board to them—not smashing them. This is one rep.
ADVERTISEMENT
Repeat for 30 reps, rocking from the outside of the heel to the big-toe side of the forefoot. Then do 30 reps rocking from the arch side of the heel to the pinky-toe side of the forefoot. (Note: when done on a MOBO board, the rocker fins guide you in the desired rotational directions).
Repeat this entire sequence for the left foot.
RELATED: A Simple Mobility Routine for Happy Joints
Achilles Injury Rehab and Prevention Exercises: Tippy Bird
The deadlift is a key exercise to improve the posterior chain as you hinge from the hips. However, most people tend to reach forward, increasing load on the spine, instead of pushing their hips back.
Doing a deadlift on a MOBO has two main benefits. First, if you reach forward, the board tips down. This will cue you to drive the hips back properly and improve load to the hips. Second, it forces you to screw your big toe in as you screw your hip out, to maintain stability. Combined, you get a ton of benefit on your foot and does a great job to load your hip to work on propulsion.
For this exercise, 100% of the motion is a hinge from your hips while the spine remains 100% stable.
ADVERTISEMENT
Step onto the board with your right foot, with your left leg hovering off the ground. Push your hips back so that your trunk becomes near horizontal and the left leg moves out behind you. Use your hands as a cue to ensure your hips stay level.
Drive back up to standing to complete one rep. The knee stays softly bent. You should always be looking in the same direction as your chest is pointing. This is a hinge, not a squat so the knee only stays slightly bent through the movement.
Aim for 3 sets of 10 reps and then switch legs.
For an added challenge, grab a weight in the hand on the side of your non-supporting leg (a kettle ball, or just a gallon of milk).
—
Check out Dicharry’s complete course on maximizing your stability and durability for more efficient, less stressful miles:
ADVERTISEMENT
Run College: Optimize Your Stride
—
Jay Dicharry, MPT, SCS is a physical therapist and researcher in Bend, OR. He is author of Running Rewired and Anatomy for Runners.